
Instruction Guide


pg 7
/^>EDKhEd,KK^
&ŝdžŝŶŐƚŽƚŚĞĞŝůŝŶŐ
1.. Remove the hood from the packaging. Plug unit in and
ƚĞƐƚĂůůĨƵŶĐƟŽŶƐďĞĨŽƌĞŝŶƐƚĂůůĂƟŽŶ͘
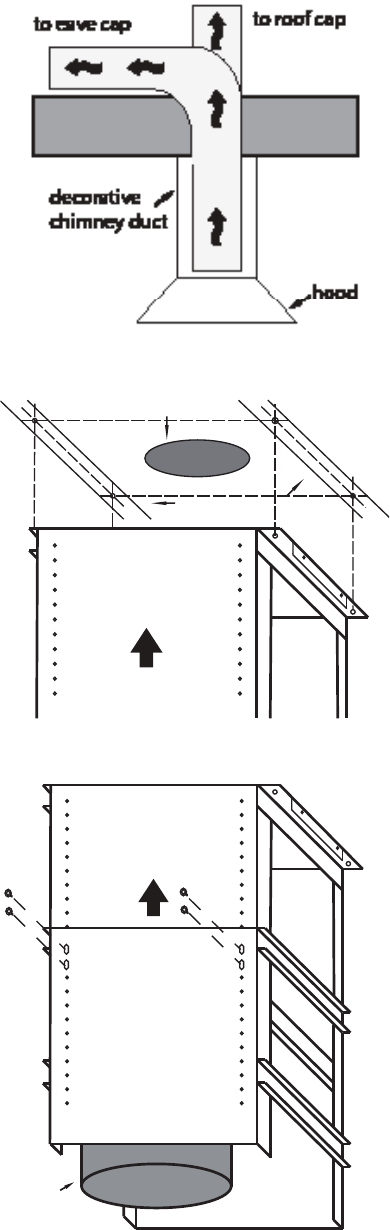
2. Separate the inner and outer parts of the telescopic cage.
3. Note the side of the cage that has the arrow on it. When
installed, this is the side of the hood that will have the
controls.
4. Centre the upper cage on the ceiling around the exhaust
duct opening. Ensure that a) the markings coincide with
the cross-bracings between the ceiling joists and b) the
ĐĂŐĞŝƐƐƋƵĂƌĞǁŝƚŚƚŚĞĐŽŽŬŝŶŐƐƵƌĨĂĐĞďĞůŽǁ͘
5. Mark the upper screw holes on the ceiling.
ϲ͘ WĂƌƟĂůůLJƐĐƌĞǁƚŚƌĞĞŽĨƚŚĞĨŽƵƌƐĐƌĞǁƐŝŶƚŽƚŚĞĐĞŝůŝŶŐĂƚ
ƚŚĞƐĞŵĂƌŬŝŶŐƐ͘/ŶƐĞƌƚƚŚĞƵƉƉĞƌĐĂŐĞ͕ƌŽƚĂƟŶŐƚŽĮƚ͘
7. Screw in the fourth screw. Tighten the other three. The
ĐĂŐĞƐŚŽƵůĚŶŽǁďĞĮƌŵůLJĂƩĂĐŚĞĚƚŽƚŚĞĐĞŝůŝŶŐ͘
8. insert the lower cage over the upper cage. Adjust the
height to the necessary distance using screws supplied.
ϵ͘ ƩĂĐŚϲ͟ĂůƵŵŝŶƵŵĚƵĐƚ;ŶŽƚŝŶĐůƵĚĞĚͿƚŽƚŚĞƉƌĞƉĂƌĞĚ
duct work in the ceiling. Seal all seams.
/ŶƐƚĂůůŝŶŐƚŚĞƵĐƚǁŽƌŬ
1. The mark on the ceiling made in the previous step will
ďĞǁŚĞƌĞLJŽƵƌϲ͟ĚƵĐƟŶŐǁŝůůƌƵŶƚŚƌŽƵŐŚƚŚĞĐĞŝůŝŶŐ͘
Around this point install cross bracing between the ceil-
ing joists to support the weight of the hood.
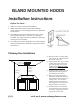
Ϯ͘ ƌĚĂŝƐůĂŶĚŚŽŽĚƐĞdžŚĂƵƐƚǀĞƌƟĐĂůůLJƵƉƚŚƌŽƵŐŚƚŚĞĐĞŝů-
ing to the roof. They can be exhausted sideways above
the ceiling to an eave cap.
3. Install a roof or eave cap. Connect a 6” round metal duct
to the cap and work backwards toward the hood. Ensure
joints are completely sealed with duct tape.
ϯ͘džŚĂƵƐƚĂŝƌŵƵƐƚŶŽƚďĞĚŝƐĐŚĂƌŐĞĚŝŶƚŽĂŇƵĞǁŚŝĐŚŝƐ
used for the exhaust fumes from other appliances.
Front of Range/Cooktop
Ceiling duct opening
Cross-Bracings
Front of Range/Cooktop
Lower Cage
6” Aluminum Duct