
User guide

The Other YN-622C User Guide v.4.07
23/07/2014
Part III – C-TX Controller Page 43 of 62
C-TX CONTROLLER FEATURES
Update C-TX Firmware
See “Getting Started” on page 20.for a version history.
Download and instal the Firmware Updater
• Do this once, unless the Updater itself is updated
• Updating requires a Windows environment.
• Go to product page http://www.hkyongnuo.com/e-detaily.php?ID=348
• Download YN_Trigger_Updater.zip
• Unzip YN_Trigger_Updater_Setup.exe.
• Run YN_Trigger_Updater_Setup.exe to install the driver and updater in your computer
C:\Program Files.
Download and Unzip - YN_622C-TX_FW_V 1.03.zip (or later)
• YN622C-TX_FW_V1.03.dfu.
Changelog_CN.txt
Changelog_EN.txt – shows changes incorporated in the update.
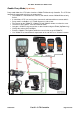
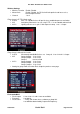
Set C-TX to Upgrade Mode, and connect
• Turn off C-TX, then hold down [Mode] and turn the
C-TX on again. The firmware upgrade mode will show YN | 622 | 1.01 U P, where 1.01 is
the current version in the C-TX.
• Connect the C-TX to your Windows PC via a USB miniB cable (e.g. Canon camera cable).
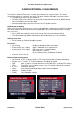
Instal the Firmware
• Run YN_Trigger_Updater English from your computer’s Start menu. (CN, RU or a
language-selectable version may be available.)
• Use "Browse..." to navigate to the required “.dfu” version, and open.
• Check that firmware version is as expected, then click "Update".
• The Updater will show e.g. “YN-622C Controller, Version 1.02 updated successfully”, and
the C-TX will reset automatically using the new version.
• If an error is encountered, turn off the C-TX and try again. If installation fails a second time,
re-download the files.
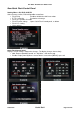
Set Channel [Ch]
There are 7 radio channels which can be used to avoid interference from other photographers, or
from sources like wireless network hubs.
• Default value is 1.
• Long press [Ch] to activate channel selection. The current value will wink.
• Quickly press [Up] or [Right] to step cyclically up through 1 to 7. Use [Down] or [Left] to step
down.
• The setting mode will quickly time-out.
• Ensure that the remote 622Cs are re-assigned the same channel.