YoLink SpeakerHub YS1604-UC Set-up & User Guide Rev 1.
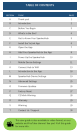
TABLE OF CONTENTS SECTION TOPIC PAGE A Thank you! 1 B Introduction 2 C Before You Begin 3 D What’s in the Box? 4 E Get to Know Your SpeakerHub 5 F Install the YoLink App 6 G Open the App 7 H Add Your SpeakerHub to the App 8 I Power Up the SpeakerHub 10 J Mobile Device Settings 11 K Connect Hub to WiFi 13 L Introduction to the App 18 M SpeakerHub Device Settings 19 N Advanced Settings 25 O Firmware Updates 26 P Factory Reset 27 Q CE Mark Warning 28 R Wa
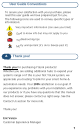
User Guide Conventions To assure your satisfaction with your purchase, please read this user guide we have prepared just for you.
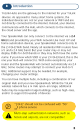
B Introduction YoLink Hubs are the gateway to the internet for your YoLink devices. As opposed to many smart home systems, the individual devices are not on your network or WiFI and are not directly connected to the internet. Instead, your devices communicate with the Hub, which connects to the internet, the cloud server and the app. Your SpeakerHub can only connect to the internet via a 2.
C Before You Begin Find a suitable place for your SpeakerHub to live. SpeakerHub wants to be indoors, clean and dry. SpeakerHub is not designed for wall-mounting. Place your SpeakerHub at a location where you can hear the speaker clearly, at a moderate volume level. Avoid placing your SpeakerHub inside a cabinet, or on or near metal, magnets, or sources of radio or electromagnetic energy or interference, such as radio transmitters, as well as other WiFi equipment.
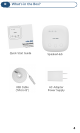
D What’s in the Box? Quick Start Guide USB Cable (“Micro B”) SpeakerHub AC Adapter Power Supply 4
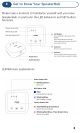
E Get to Know Your SpeakerHub Please take a moment to familiarize yourself with your new SpeakerHub, in particular the LED behaviors and SET button functions.
F Install the YoLink App 1 If you are new to YoLink, please install the app on your phone or tablet, if you have not already. Otherwise, please proceed to part H. 2 Scan the appropriate QR code below or find the “YoLink app” on the appropriate app store. Apple phone/tablet iOS 9.0 or higher Android phone/tablet 4.4 or higher 3 Open the app and tap Sign up for an account. You will be required to provide a username and a password. Follow the instructions, to set up a new account.
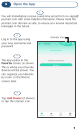
G Open the App 1 You will immediately receive a welcome email from no-reply@ yosmart.com with some helpful information. Please mark the yosmart.com domain as safe, to ensure you receive important messages in the future. 2 Log in to the app using your new username and password Scanner icon 3 The app opens to the Favorite screen, as shown. This is where your favorite devices will be shown. You can organize your devices by room, in the Rooms screen, later.
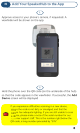
H Add Your SpeakerHub to the App 1 Approve access to your phone’s camera, if requested. A viewfinder will be shown on the app. 2 Hold the phone over the QR code (on the underside of the hub) so that the code appears in the viewfinder. If successful, the Add Device screen will be displayed If you experience difficulties scanning in a new device, ensure the code is not dirty or smudged, and that the camera has adequate lighting.
H Add Your SpeakerHub to the App, Cont. 3 You can change the device name and assign it to a room later. Ensure that the Favorite icon is selected as shown (red heart). Tap Bind device 4 If successful, the screen will appear as shown.
I Power up the SpeakerHub 1 Connect the supplied USB cable to the hub and to the power adapter as shown. Plug in the adapter.
J Mobile Device Settings 1 iOS phones only: if prompted, enable Local Network Access. (Search “iOS location services” for more information) 2 If prompted, grant access to your location. Tap Allow Once. This is required for the next steps. To check or edit Location Services on your phone: iOS: Go to Settings, tap Privacy, tap Location Services Ensure Location Services is on/enabled.
J Mobile Device Settings, Continued 1 In your phone, open WiFi settings (Settings, WiFi) 2 Identify your 2.4 GHz network, if possible. If there is only one SSID (network ID) you recognize, you will use that one 3 Select the appropriate network and log-in, if needed 4 If your SSID is hidden, you must manually log into it on your phone, by selecting “Other...
K Connect Hub to WiFi 1 From the Rooms or Favorites screen, tap on the SpeakerHub icon, as shown in the left figure 2 Tap on the WiFi icon as shown on the right figure 13
K Connect Hub to WiFi, Continued 3 Please review the instructions on the Setup Wi-Fi screen. After pressing the SET button on the SpeakerHub, you will then log into the SpeakerHub’s hotspot on your phone. This will need to be done with no delays between steps, otherwise the Hub will exit hotspot mode (in 5 minutes).
K Connect Hub to WiFi, Continued 4 As directed in the app, press the hub’s SET button for 5 seconds or until the WiFi LED flashes rapidly 6 Log-in to the SpeakerHub hotspot. It is identified as YS_1604000bc7. Disregard any messages about no internet connection. If requested, approve “Once” or “This Time Only” 7 If you get an error message as shown below, or if requested, grant access to your phone’s location data, also known as “Location Services” (As noted in Part J). Tap Allow Once, if applicable.
K Connect Hub to WiFi, Continued 7 If you see a “connect to device timeout” message, tap Close 8 Return to the app. Check the “Please confirm the above operation” checkbox. Tap Continue. The Enter WiFi Password screen appears as shown MyWiFi 9 In the Choose a WiFi box, select or enter your 2.4 GHz SSID (unless it is hidden, it should appear in the list, when you tap in this area).
K Connect Hub to WiFi, Continued 10 The “Set up WiFi successfully” message should appear on the screen as shown. Tap Done 11 The SpeakerHub’s blue internet status LED should be on, indicating an internet connection is established 12 At first, in the app, your SpeakerHub may appear offline. Tap the Refresh icon or swipe down on the screen to refresh the screen.
L The YoLink App New to the YoLink app? Please visit our SpeakerHub support page, for additional support information and resources for your SpeakerHub, as well as for the YoLink app. Take a look around the SpeakerHub area, then, click YoLink Academy for documents and videos that will explain the features of the app and show you how to change notification settings, and how to set up scenes and automations, etc. Scan the QR code or click the link to visit our SpeakerHub support page on yosmart.
M SpeakerHub Device Settings 1 From the Rooms screen, tap the SpeakerHub icon. Please review the image before tapping the three dots (“more”) icon.
M SpeakerHub Device Settings, Continued 2 Please review the summary of the SpeakerHub device details screen before proceeding to the next step. Device type Device name Device room Favorite icon (select to add the device to your Favorites screen) Alarm strategy for this device Device online/offline state Speaker volume level (1 minimum, 16 max.
M SpeakerHub Device Settings, Continued Your WiFi network name IP Address info Device model number Device EUI (ID) number Device serial number Device firmware version (see part P) Tap to delete the device from your account 21
M SpeakerHub Device Settings, Continued Your SpeakerHub can broadcast a message via the following methods: • • • • Manually, from the device screen Automatically per your Alarm Strategy settings As part of a scene, triggered from a strategy, manually triggered by the user in the app, manually triggered by an AlarmFob or FlexFob activation As part of an automation, triggered by a device changing state or by schedule The easiest way to start using your SpeakerHub is with it configured as a “trigger action
M SpeakerHub Device Settings, Continued Tap the back arrow to return to the main SpeakerHub screen shown in step 1. Tap the “play” icon (triangle) This screen is used to create a one-time broadcast over the SpeakerHub. It is also good for testing your messages before adding them to a scene or automation.
M SpeakerHub Device Settings, Continued “Play Tone” include a Notification Tones and a Customer Source sub-list of tones and sounds. Customer Source includes customer-supplied audio files. Audio file uploading is not available at the date of user guide publication (this s feature will be added soon). Additional Customer Source audio files have been factoryinstalled in the SpeakerHub. Type your desired spoken message into the Message box. You can test your message by tapping the Play Message button.
N Advanced Settings Do you want to get the most out of your SpeakerHub? We know you didn’t buy a SpeakerHub just because it would look good on your nightstand. You have plans for it, like for it to inform you of a water leak, or of a high temperature alert in the freezer or of motion being detected in the back yard (or all of the above!).
O Firmware Updates Your YoLink products are constantly being improved, with new features added. It is periodically necessary to make changes to your device's firmware. For optimal performance of your system, and to give you access to all available features for your devices, these firmware updates should be installed when they become available In the Detail screen of each device, at the bottom, you will see the Firmware section, as shown in the image below.
P Factory Reset Factory reset will erase device settings and restore it to factory defaults. Doing a factory reset will remove the device from your account and it will not harm the device and will lose any data or require you to re-do your automations, etc. Only deleting a device from the app will remove it from your account Instructions: Hold the SET button down for 20-25 seconds until the FEAT (feature) LED blinks red.
Q CE Mark Warning The host manufacturer has the responsibility that the host device should be compliance with all essential requirement of RER. This restriction will be applied in all member states. The simplified UK declaration of conformity referred shall be provided as follows: Hereby, YoSmart Inc.
R 2-Year Limited Electrical Warranty YoSmart warrants to the original residential user of this product that it will be free from defects in materials and workmanship, under normal use, for 2 years from the date of purchase. User must provide a copy of original purchase receipt. This warranty does not cover abuse or misused products or products used in commercial applications.
T Contact Us / Customer Support We are here for you, if you ever need any assistance installing, setting up or using a YoLink app or product! Need help or have questions? Please email us 24/7 at service@yosmart.com For additional SpeakerHub support resources, visit our SpeakerHub support page at: www.yosmart.com/speakerhub-product-support You can also find additional support and ways to contact us at: www.yosmart.