
Instruction Manual


IM 11M12A01-03E
3-4
3.2 Installation of the Converter
3.2.1 Location
The following should be taken into consideration when installing the converter:
(1) Readability of the indicated values of moisture concentration or messages on the
converter display.
Easy and safe access to the converter for operating keys on the panel.
(2) Easy and safe access to the converter for checking and maintenance work.
(3) An ambient temperature of not more than 558C and little change in temperature
(recommended within 158C in a day).
(4) The normal ambient humidity (recommended between 40 to 75 %RH) and without
any corrosive gases.
(5) No vibration.
(6) Near to the detector.
(7) Not in direct rays of the sun. If the sun shines on the converter, prepare the hood (/
H) or other appropriate sunshade.
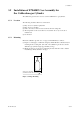
3.2.2 Mounting of the Converter
The converter can be mounted on a pipe (nominal JIS 50A: O.D. 60.5 mm), a wall or a
panel. The converter can be mounted at an angle to the vertical, however, it is recom-
mended to mount it vertically plane.
Mount the converter as follows.
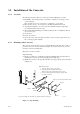
<Pipe Mounting>
(1) Prepare a vertical pipe of sufficient strength (nominal JIS 50A: O.D. 60.5 mm) for
mounting the converter. (Converter weighs approximately 6 kg.)
(2) Mount the converter on the pipe. Fix it firmly on the pipe in the procedure described
in Figure 3.3.
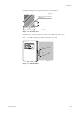
A pipe to be mounted (nominal JIS 50A)
Bracket
Nut
Washer
Bolt
*Screw
*Washer
*Fitting
* Note: These fittings are attached to the equipment when it is delivered.
F3.7E.EPS
dMounting procedure
1. Put four bolts in the holes on the fitting.
2. Clamp the pipe with the fitting and a bracket,
with the four bolts passing through the bracket holes.
3. Secure the fitting and the bracket tightly to the pipe with
four washers and nuts.
Figure 3.3 Pipe Mounting