Service Manual DAQSTATION CX1000/CX2000 SM 04L31A01-01E SM 04L31A01-01E Yokogawa Electric Corporation 2nd Edition
Important Notice to the User This manual contains information for servicing YOKOGAWA’s DAQSTATION CX1000/ CX2000. Check the serial number to confirm that this is the correct service manual for the instrument to be serviced. Do not use the wrong manual. Before any maintenance and servicing, read all safety precautions carefully. Only properly trained personnel may carry out the maintenance and servicing described in this service manual.
Introduction This manual contains information for servicing YOKOGAWA’s DAQSTATION CX1000/ CX2000. Note This is the second edition of the manual, dated August 2002. WARNING This service manual is to be used by properly trained personnel only. To avoid personal injury, do not perform any servicing unless you are qualified to do so. Refer to the safety precautions prior to performing any service.
Do Not Operate Near Flammable Materials Do not operate the instrument in the presence of flammable liquids or vapors. Operation of any electrical instrument in such an environment constitutes a safety hazard. Do Not Remove Any Covers There are some areas components inside the instrument containing high voltage. Do not remove any cover, if the power supply is connected. The cover should be removed by qualified personnel only.
Overview of This Manual This manual is meant to be used by qualified personnel only. Make sure to read the safety precautions at the beginning of this manual as well as the warnings and cautions contained in the chapters relevant to any servicing you may be carrying out. This manual contains the following chapters. 1 Principles of Operation Provides an introduction and safety considerations. 2 Testing Explains the tests for checking the performance of the instrument.
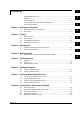
1 Contents Important Notice to the User ............................................................................................... 1 Introduction ......................................................................................................................... 2 2 Safety Precautions .............................................................................................................. 2 Safety Symbols Used on Equipment and in Manuals ....................................................
Chapter 1 Principles of Operation 1.
1.2 Input Section A/D Assembly The A/D assembly has items such as a programmable gain amp, voltage reference, PWM modulator, current source for RTD measurements, differential amp, voltage source for RJC, serial parallel converter, control logic, and an occurred scanner SSR control signal. The A/D assembly uses a sinewave oscillating type self-resonant switching power supply (DC/DC converter), and noise filtering is achieved by signal integration.
1.2 Input Section 1 Calculation Function Measurement Alarm Function The following eight alarm types can be set. High limit (H), low limit (L), differential high limit (h), differential low limit (l), rate-ofchange on increase (R), rate-of-change on decrease (r), alarm delay upper limit alarm (T), or alarm delay lower limit alarm (t). Control Alarm Function The following nine alarm types can be set.
Chapter 2 Testing 2.1 Overview of Tests Operating Conditions Ambient Temperature: Relative Humidity: 23 ± 2°C 55 ± 20% Test Instruments Instrument Specifications DC voltage generator Accuracy: 0.005% of setting + 1 mV DMM Accuracy: 0.005% of rdg + 1 mV Resistors Accuracy: 0.01% or better Insulation tester 500 VDC Withstanding voltage tester AC 1 to 3 kV, 500 VDC External monitor (for test of /D5 option) VGA monitor (H: 33.3 kHz, V: 60.
2.1 Overview of Tests Tests Insulation Resistance Test Withstand Voltage Test Measurement Accuracy Test Error between Channels Test Excessive Input Test Burnout Test Reference Junction Compensation Accuracy Test Display Function Test VGA Output Function Test (For /D5 Option Only) Serial Communications Function Test (Only When The -1 Or -2 Suffix Code Is Specified For The Communications Port).
2.2 Test Procedures Insulation Resistance Test 2 Terminals Reference Values Notes Power terminal to earth terminal Measurement input terminal to earth terminal Control input terminal to earth terminal 100 MΩ or higher Short all channels prior to test RS-422-A/485 SG terminal to RS-422-A/485 FG terminal 100 MΩ or higher Test only if the basic specification code for the communications port is -2.
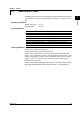
2.2 Test Procedures Measurement Accuracy Test (Measurement Input and Control Input) Check that the specifications below are met given the following operating conditions: 23 ± 2°C, 55 ± 10% RH, and a warm up time of 30 minutes. Range Input Value Criterion Specifications 20 mV +20.00 mV 0.00 mV –20.00 mV ±3 digits ±2 digits ±3 digits ±(0.1% of rdg + 2 digits) 60 mV +60.00 mV 0.00 mV –60.00 mV ±6 digits ±2 digits ±6 digits ±(0.1% of rdg + 2 digits) 200 mV +200.0 mV 0.0 mV –200.
2.2 Test Procedures Burnout Test 1. 2. 3. 4. 5. 6. 7. Reference Junction Compensation Accuracy Test Perform 0°C measurement for TYPE - T on all control and measurement channels, and confirm that the result is below the following reference value. Reference value: 0 ± 0.5°C CAUTION • • • • • • • Use a calibrated non-insulated thermocouple without a terminal tip, having a Φ0.5 mm or narrower strand. Also, be sure to take the level of calibration error into consideration during testing.
2.2 Test Procedures 5. 6. 7. 8. 9. 10. Press ESC to return to the previous screen. Press the View, Direction, LCD soft key. Move the cursor to Brightness. For the CX1000, select 1 through 8 and confirm that each brightness level is brighter than the one before it. For the CX2000, select 1 through 4 and confirm that each brightness level is brighter than the one before it. During other phases of testing as well, always be checking for any abnormalities in the display that may appear. Set Brightness to 3.
2.2 Test Procedures Current Output Accuracy 1. 2. 4. 5. 6. 7. Output Ratio Reference Value 0.0% 4 mA 100.0% 20 mA Allowable Range 3.984 to 4.016 mA 19.984 to 20.016 mA (Load condition: 250 Ω ±1%) Voltage Pulse Output 1. 2. 3. 4. Choose Output processing by following the procedures in step 1 of “Current Output Accuracy.
2.2 Test Procedures Test of Digital Input/Output (not applicable for models CXx0xx) Digital Input 1. Press the DISP/ENTER key and choose CONTROL and then DI/DO STATUS. 2. The digital input terminals are divided into blocks. Short-circuit between the common terminal and the terminals, and check the DI status display. The indicator is green for an open circuit and red for a short circuit. Digital Output 1.
2.2 Test Procedures Test of Storage Drive 1. 2. 3. Test of Alarm Relay Contact Outputs (applicable to option codes /A6, /A6R, /A4F and / A4FR) Insulation Resistance and Withstanding Voltage Tests Item Measured Point Specification Insulation resistance Between relay output terminals and grounding terminal No less than 20 MΩ at 500 V DC Withstanding voltage As above Free from damage after applying 1500 V AC, 50/60 Hz for 1 minute (with breaking leakage current set to 2 mA) Alarm Actions 1.
2.3 CTRL Module Assembly Tests This section describes the test procedure for CTRL MODULE ASSY (B8700CL, B8700CM, B8700CN, and B8700FT) which is used on the CX2000. This test is not necessary if you will perform the general tests in section 2.2. Perform this test on the module by itself. Test Instruments Instrument Specifications DC current meter Accuracy: 0.
2.4 DIO Module Assembly Test Test Instruments Instrument Specifications Withstanding voltage tester AC 1 to 3 kV, 500 VDC Jig A measurement instrument having the same functions and characteristics as the CX1000/CX2000 Tests • Withstand Voltage Test Consult your nearest Yokogawa representative regarding the following tests.
Chapter 3 Adjustments 3.1 Calibration of the Measuring Instrument’s Input Allow the instrument to warm up for at least 30 minutes prior to calibration. Instruments for Calibration Accuracy: 0.005% of setting +1 µV 100 Ω, 300 Ω (accuracy: 0.01% or less) DC voltage generator Resistor 3 Adjustments Overview The structure of the A/D converter in the CX2000 differs depending on the model. Multiple channels (groups) share one A/D converter.
3.1 Calibration of the Measuring Instrument's Input Calibrating the Input Range For each group, input the zero and full scale for the input range to the channels below and perform calibration. CX1000 • Voltage Range Control Number of Internal Group 2 (1—5ch) Control Loops Zero Full Scale 0 loops — — 2 loops CH1* CH2* * The expression channel is not used for control input, but for expediency the inputs are referred to (from right to left) as CH1 and CH2 respectively. Monitor No. of Inputs for Meas.
3.1 Calibration of the Measuring Instrument's Input • RTD Range Control (1st Slot) Number of Internal Group 1 Group 2 Control Loops 100 Ω 0 loops — — — — 2 loops CH1 CH2 — — Loops 4, 6 CH1 CH2 CH6 CH7 300 Ω 100 Ω 300 Ω 3 Monitor (2nd, 3rd Slot) Group 1 Adjustments Model Group 2 100 Ω 300 Ω 100 Ω 300 Ω 10 ch CH1 CH2 — — 20 ch CH1 CH2 CH11 CH12 Calibration Procedure The calibration procedure can be carried out using keys on the instrument or communications commands.
3.1 Calibration of the Measuring Instrument's Input 4. Press the ENTER key. The A/D adjust screen is displayed. 5. Input the zero and full scale value to the calibration channels shown in "Calibrating the Input Range" (page 3-2). Press the Cal/Exec soft key. The A/D adjust (Cal/Exe) screen is displayed. 6. CAUTION If you select Display in the A/D adjust screen, you can confirm the calibrated value and manually input values using keys.
3.1 Calibration of the Measuring Instrument's Input Calibration Using Communications The calibration process proceeds as follows: 1. Enter Calibration mode 2. Perform calibration 3. Store the calibrated values 4. Return to operation mode The commands necessary for calibration are listed below. For the input connection method, see "Input Range Calibration" on page 3-2.
3.2 Control Output Calibration Allow the instrument to warm up for at least 30 minutes prior to calibration. Instruments for Calibration DC current meter Resistor Accuracy: 0.01% of rdg 250 Ω ± 1% Overview of Calibration During calibration of the control output (current output terminal), each output is connected to one D/A converter, so you must calibrate the outputs separately. The module installed in the CX1000 is 01. In the CX2000, the modules are numbered in order (01, 02, 03) from top to bottom.
3.2 Control Output Calibration 6. Press the Write function key for each output number. The calibration values are saved. 3 Adjustments 7. 8. 9. Repeat steps 4—6 and calibrate all module and output numbers. Press ESC. You are returned to the calibration screen. Turn OFF the power Calibration Using Communications The commands required for control output calibration are listed below. For other necessary commands, see Calibration Using Communications (page 3-5) in section 3.
Chapter 4 Replacing Parts 4.1 Replacement of the Control Output Terminal Block (Module) WARNING Replacement of terminal blocks and control relays are to be carried out by engineers authorized by YOKOGAWA. When replacement becomes necessary, please contact your nearest dealer or YOKOGAWA representative. 4 Replacing Parts Parts List CX1000 Part No.
4.1 Replacement of the Control Output Terminal Block (Module) Replacement of Each Terminal Block (Module) WARNING • To prevent electric shock, cut the power to the main unit and disconnect any wiring that may be connected to it before replacing the terminal block. • To prevent electric shock when disconnecting wires, ensure the main power supply is turned OFF. Follow the procedures below to replace the blocks. 1.
4.1 Replacement of the Control Output Terminal Block (Module) Connector Connector Terminal cover screws Terminal cover screws Terminal block attachment screws Terminal block attachment screws 4. Loosen the 2 terminal block attachment screws. Pull the terminal block straight out and away from the unit. Be careful not to bend the connector pins while removing the terminal block. Open the back lid of the terminal block.
4.1 Replacement of the Control Output Terminal Block (Module) 6. Insert the relay into the socket by hand, with the line on the top of the relay facing to the left. This line faces left 7. 8. Close the back lid of the terminal block. Check the angle of the terminal block, install it on the main unit, and then fasten by tightening the terminal block attachment screws. 9. Install the terminal cover, and fasten with the terminal cover screws. 1 0 .
Chapter 5 Troubleshooting 5.1 Procedure 1 2 3 4 Determine the type of problem. Check for possible user error. Check the connections and the settings of equipment to determine whether there was a handling mistake. Execute the self diagnostic test by turning the power ON, and identify any problem items. Analyze the cause of the problem according to the troubleshooting flow chart. Do not touch the circuit or parts with live voltage because the power unit contains a highvoltage electrical circuit.
5.2 Flow Chart This flow chart consists of general service operations when a fault occurs. This chart is not always suitable for every kind of fault. However, it is recommended to perform operations according to the flow chart.
Troubleshooting Checklist Operational Power cable connection Fuse is blown (/P1 option only) Power ass’y CPU ass’y Memory ass’y Display ass’y FAIL state CPU ass’y Memory ass’y Display ass’y Optional terminal ass’y Memory cannot be backed up Battery connector is disconnected? Battery voltage is low (less than +3.
SM 04L31A01-01A CN8 CN101 CN7 CN1 CN3 CN13 CN4 CN15 CN2 B9967TF (AF/DC24V) A1485UP (STD) POWER SUPPLY CN1 B9967MC CN3 B9968MG CN2 B9967UD (AC/DC24V) B9967TD (STD) SUB POW BOARD ASSY CN3 CN4 POWER CABLE CN41 CN1 POWER CABLE CN42 SCREW CN3 CN1 CN16 OUTPUT MAIN BOARD ASSY B8700RG CN2 CN2 OUTPUT SUB BOARD ASSY B8700SH CN1 CN2 A1053VA LCD & INVERTER SW BOARD ASSY B9967TC CN1 CN3 KEY FPC B9967MB B8700RK DISPLAY BOARD ASSY CN3 CN1 B8700RA CN2 CN1 B9900BR BATTERY ASSY CN2 B8
6-2 CN2 CN14 CN4 CN13 CN15 CN3 CN11 CN41 CN1 VGA OUT CN3 CN2 CN1 B9968UX VGA BOARD ASSY CN2 DISP CABLE B9968MD AD BOARD ASSY B9968QA CN2 LCD A1067VA INVERTER UNIT A1527UP CN2 CN1 CN35 B9900BR BATTERY ASSY CN2 B8700UZ ZIP DRIVE A1131UN CN2 ZIP CONN BOARD ASSY B9968SU B9968MB B9968MA FDD DRIVE A1092UN IDE FFC CN1 CN2 FDD FFC CN2 +RS-232 CN1 CN2 PC-CARD BOARD ASSY B9968SV TM1 RS-422 B9968RK +RS-422 B9968RJ CN2 CN3 ETHERNET RS-232 IDE BOARD ASSY B9968ST CN1 B9968TP FDD
Chapter 7 Customer Maintenance Parts List 7.1 CX1000 Customer Maintenance Parts List 7 Customer Maintenance Parts List Note: Parts marked with a SM 04L31A01-01A symbol are CMPL (Customer Maintenance Parts List) parts.
7.1 CX1000 Customer Maintenance Parts List Complete Set 5 6 5 7 1 7-2 2 3 4 Item 1 2 3 4 5 Part No. B9967AM B8700EN Y9308LB B8700FA B9968AT Qty 1 1 2 1 4 6 7 B8700DR B9967AX 2 1 Description Tag Cover Tag Plate B.H.
7.
7.1 CX1000 Customer Maintenance Parts List 2 Part No.
7.1 CX1000 Customer Maintenance Parts List Bezel Assembly 18c 20 18a 18 19 21 22 18b 7 Customer Maintenance Parts List 17 16 15 14 13 12 10 1 11 9 8 2 3 4 5 6 7 Item 1 2 3 4 5 Part No. Qty Description B8700FH 1 Key Case Assembly B9967BN 1 Hinge Pin B9567AQ 1 Spring B9967BP 1 Front Plate E9655AL 1 Spring Item 12 13 14 15 16 Part No.
7.
7.1 CX1000 Customer Maintenance Parts List Item Part No.
7.2 CX1000 Standard Accessories 1 2 3 4 6 5 Item Part No. 1 IM04L31A01-03E IM04L31A01-04E IM04L31A01-72E IM04L31A01-73E 2 B9900BX 3 4 5 6 7 7-8 E9655FX A1053MP B9968PK CXA100-01 B8700MA Qty 1 1 1 1 2 5 1 1 1 1 7 Description DAQSTATION CX1000 User’s Manual DAQSTATION CX1000 Operation Guide Precautions on the Use of the CX1000/CX2000 CX1000 Installation and Connection Guide Bracket Assembly B.H.
7.3 CX2000 Customer Maintenance Parts List 7 Customer Maintenance Parts List Note: Parts marked with a SM 04L31A01-01A symbol are CMPL (Customer Maintenance Parts List) parts.
7.3 CX2000 Customer Maintenance Parts List Complete Set 1 4 3 2 6 5 7 2 3 4 Part No. B8700BA B8700BE Y9414LB B8700AF B9968AM Qty 1 1 3 1 1 5 6 7 B9968AT B8700DR B9968AX 4 4 1 Item 1 7-10 Description Bezel Assembly† (select) (see page 7-13) Bezel Assembly* B.H.
7.
7.3 CX2000 Customer Maintenance Parts List Part No.
7.3 CX2000 Customer Maintenance Parts List Bezel Assembly 25 26 24 23 22 29 28 27 21 20 19 Customer Maintenance Parts List 18 17 16 15 14 13 11 12 10 4 2 3 4 5 6 7 8 9 10 11 12 13 Part No.
7.
7.3 CX2000 Customer Maintenance Parts List Qty Item Part No.
7.4 CX2000 Standard Accessories 2 1 4 3 6 5 7 Item Part No. 1 IM 04L31A01-01E IM 04L31A01-02E IM 04L31A01-71E IM 04L31A01-72E 2 B8700MA 3 4 5 6 7 B9900BX E9655FX A1053MP B9968PK CXA100-01 Qty 1 1 1 1 1 Description DAQSTATION CX2000 User’s Manual DAQSTATION CX2000 Operation Guide CX2000 Installation and Connection Guide Precaution on the Use of the CX1000/CX2000 CD for Manual for CX 2 5 1 1 1 Bracket Assembly B.H.
Chapter 8 Procedures for Disassembly (CX1000) 8.1 Removing the Bezel WARNING The service manual is to be used by properly trained personnel only. To avoid personal injury, do not perform any servicing unless you are qualified to do so. Refer to the safety precautions prior to performing any servicing. Even if servicing is carried out according to this service manual, or by qualified personnel, YOKOGAWA assumes no responsibility for any result occurring from that servicing.
8.1 Removing the Bezel Note • A gasket is attached to the edge of the case. When reinstalling the bezel, be sure that the gasket is correctly fastened. • A lever is attached to the right side of the bezel. By hooking the lever onto the side of the case, you can lock the bezel in the open position. Lever • The power switch is located in the upper left as you are facing the instrument.
8.1 Removing the Bezel Removing the Bezel 3. Remove the two flexible cables that connect the bezel to the main unit. The connector utilizes a latch. Pull outwards on the left and right sides of the latch to release it, then pull out the cable. Connector 4. Release the bezel by pushing the latches on the left and right hinge arms using a long pointed tools such as a Phillips head screw driver. With the latches pushed in, pull the bezel out and remove it from the main unit.
8.2 Removing the Board Assemblies and the Drive 1. Remove the bezel (see section 8.1). Removing the Board Assemblies 2. Remove the three bracket screws. 3. Slide the bracket down to pop it out of position, then remove it. Removing the bracket allows removal of all board assemblies. CX with the bracket removed. S-Power Assembly Comm Board Assembly CPU Board Assembly AD Assembly MON Scanner Assembly 4. Pull out and remove the S-Power assembly, Comm Board assembly, and CPU Board assembly.
8.2 Removing the Board Assemblies and the Drive Removing the Drive 1. Remove the screw as shown in the figure below. 2. Remove the drive by pulling it outwards. CAUTION The ZIP drive has a thin transparent plate that can be sharp. Take care not to cut your fingers when removing the drive. CX with all boards and the drive removed.
8.3 Removing the Keyboard 1. 2. 3. Remove the bezel (see section 8.1). Remove the two screws attaching the aluminum sheet to the back of the bezel. Remove the keyboard flat cable rivet. When removing the rivet, first pull out the pin. Aluminum Sheet Rivet 4. Use the tip of a pen to push in the hinge pin on the left side of the Key Case assembly, then pull the assembly toward you to remove it. Be careful not to damage the flat cable when removing the assembly. 5.
8.
8.4 Replacing the Backlight 1. 2. Remove the bezel (see section 8.1). Remove the two screws attaching the aluminum sheet on the back of the bezel, and the rivet that fastens the flat cable (see section 8.3). Aluminum Sheet Rivet Display Bracket Earth Bracket 3. 4. 5. Remove screw numbers 1?3 as shown, then remove the Earth bracket. Remove screw number 4, then remove the Display bracket. Remove the LCD screen from the plastic screen cover, and set the LCD screen down on a static-proof surface.
8.4 Replacing the Backlight 8. 9. Remove the four screws from the inside corners of the LCD as shown. Remove the two contact segments one at a time by grasping them with tweezers. Contact segment Lump Cable Bracket Connector FFC Contact segment 10. 11. Remove the FFC and lump cable from their connectors. Slowly lift the bracket upward to remove the bracket assembly. Note • • Take care not to damage any components on the inverter or signal processing boards. Be careful not to damage the FFC.
8.5 Removing the Terminal Assembly WARNING The service manual is to be used by properly trained personnel only. To avoid personal injury, do not perform any servicing unless you are qualified to do so. Refer to the safety precautions prior to performing any servicing. Even if servicing is carried out according to this service manual, or by qualified personnel, YOKOGAWA assumes no responsibility for any result occurring from that servicing.