
Instruction Manual


2-47
IM 04L31A01-17E
2
Ethernet Interface
2.12 E-mail Transmission Test
Explanation
You can transmit test e-mail messages to recipient 1 or recipient 2 that you specified in
section 2.11 to confirm whether e-mail messages can be transmitted.
Items to Check before Performing This Test
• Connect the Ethernet cable correctly. For the connection procedure, see section 2.2.
• Check that the Ethernet interface settings are correct. For the procedure, see
section 2.3 or 2.5.
• Check that the e-mail settings are correct. For the procedure, see section 2.11.
When setting the Ethernet interface or e-mail, check the settings with your system or
network administrator.
Checking the Results of the E-mail Transmission Test
• The result of the e-mail transmission test can be confirmed by displaying the e-mail
log (displayed on the CX (see section 2.8)) or Web screen (see section 2.10) or by
outputting the result using the FL command (see section 6.11).
• If an error message is displayed on the CX, see appendix 7, “Messages.”
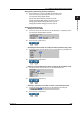
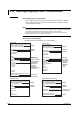
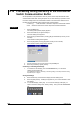
Contents of the Test E-mail Message
The figure below shows the contents of the test e-mail message. If a message is
specified, <Message> is written under <Time>
From: CX@good.com
Date: Sat, 23 Dec 2000 07:25:20 +0900 (JST)
Subject: (CX) Test_mail
To: user1@good.com
Test mail.
<Host name>
CX
<Time>
Dec.23 07:25:20
Test mail example
Procedure
Performing the E-mail Transmission Test
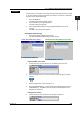
1. Press the FUNC key.
The FUNC menu appears. The structure of the FUNC menu varies depending
on the basic settings and options.
2. Press the [E-Mail test] soft key.
A menu appears for you to select the recipient for the e-mail transmission test.
3. Press the [Recipient 1] or [Recipient 2] soft key.
The e-mail transmission test to the selected recipient is executed.