User’s Manual WX201 DataBrowser IM WX201-01E 6th Edition
This user’s manual contains useful information about the functions and operating procedures of the DataBrowser and lists the handling precautions of the software. To ensure correct use, please read this manual thoroughly before beginning operation. After reading this manual, keep it in a convenient location for quick reference in the event a question arises during operation. Notes • License numbers will not be reissued. Please keep your license numbers in a safe place.
Software License Agreement IMPORTANT - PLEASE READ CAREFULLY BEFORE INSTALLING OR USING: THANK YOU VERY MUCH FOR SELECTING SOFTWARE OF YOKOGAWA ELECTRIC CORPORATION ("YOKOGAWA"). BY INSTALLING OR OTHERWISE USING THE SOFTWARE PRODUCT, YOU AGREE TO BE BOUND BY THE TERMS AND CONDITIONS OF THIS AGREEMENT. IF YOU DO NOT AGREE, DO NOT INSTALL NOR USE THE SOFTWARE PRODUCT AND PROMPTLY RETURN IT TO THE PLACE OF PURCHASE FOR A REFUND, IF APPLICABLE. Software License Agreement 1.
Software License Agreement 5. Infringement 5.1 If you are warned or receive a claim by a third party that the Software Product in its original form infringes any third party's patent (which is issued at the time of delivery of the Software Product), trade mark, copyright or other intellectual property rights ("Claim"), you shall promptly notify Yokogawa thereof in writing. 5.
Overview of This Manual Structure of This Manual This manual consists of four chapters and an index as shown below. Chapter 1 Title Before Using the DataBrowser 2 Operation of the Data Serarch Window 3 Operation of the Trend Display Window 4 Responding to Error Messages Index Description An overview of DataBrowser. Provides DataBrowser’s PC system requirements and configuration, flow of operations, and other information. Describes methods to search for data files.
1 Contents Software License Agreement............................................................................................................. ii Overview of This Manual.................................................................................................................. iv Chapter 1 Before Using the DataBrowser 1.1 1.2 1.3 1.4 Chapter 2 Overview of DataBrowser..................................................................................................... 1-1 Functional Overview.
Contents Chapter 3 Operation of the Trend Display Window 3.1 3.2 3.3 3.4 3.5 3.6 3.7 3.8 3.9 Chapter 4 Names of Parts in the Trend Display Window...................................................................... 3-1 Opening the Trend Display Window..................................................................................... 3-1 Display Channel Setting Screen...........................................................................................
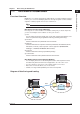
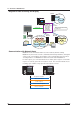
Chapter 1 Before Using the DataBrowser 1.1 1 Overview of DataBrowser DataBrowser is a software application providing data file searching and display functions. It allows you to search for and display data files saved by Yokogawa recorders and data acquisition software programs from a local or network host. Hosts on the network must be running DataBrowser. Data Search Function (Search Window) Five categories of search conditions are available, making entry of criteria simple.
1.1 Overview of DataBrowser Diagram of Data Searching and Display Host C Data on host C DAQLOGGER DAQLOGGER Send data Search conditions Date/time range (each day) File name Data type Keywords Serial numbers Display data Convert data Print Send data Send conditions Host A Data on host A CX/DX/FX Send by FTP DAQLOGGER Each host must be running DataBrowser.
1.2 1 System Requirements Run DAQWORX under any of the following operating systems.
1.3 Starting and Exiting the Software Starting the Software Procedure 1. From the Windows Start menu, choose Programs > YOKOGAWA DAQWORX > DataBrowser > DataBrowser. DataBrowser starts. Note When you start DataBrowser, it is restored to the same configuration that was active during the previous session. However, the search results in memory when exiting the software cannot be recovered in subsequent sessions. Exiting the Software Procedure 1.
1.4 1 Flow of Operations Before Using the DataBrowser The figure below shows the general flow of operation when using DataBrowser. 2 See section 1.3 Start DataBrowser. 3 See section 2.2 See section 2.7 Save and load search conditions and result Register and specify search folders 4 Searches within search results See section 2.3 See section 2.3 Specify search conditions See section 2.4 Index Specify search conditions See section 2.
Chapter 2 2.1 Operation of the Data Search Window 1 Names of Parts in the Data Search Window Menu bar Toolbar Search paths area Search conditions area 2 Operation of the Data Search Window 3 4 “Show the file information display” button Index Resize button (5) (6) Search results area File details area Menu bar (8) (9) (1) (2) (3) (10) (4) (5) (6) (7) Toolbar (2) (3) (1) (4) (7) (8) (9) (10) (1) Loads search settings from local or network hosts and displays them.
2.2 Registering and Specifying Search Folders You can register source folders for data file searches. Up to two hundred folders can be registered, and up to eight of those can be specified at a time for a search. Registering New Search Folders The following is the procedure for registering new source folders for searches on local or network hosts. Procedure 1. Open the Search window, then click the Add button in the Search paths area. The Search Path Configuration dialog box is displayed.
2.2 Registering and Specifying Search Folders 1 Add button The Search Path Configuration dialog box is displayed when this button is clicked. Remove button Deletes the selected folder registration from the Search paths area. 2 Search source check boxes Operation of the Data Search Window Select or clear the check boxes to include or exclude folders from searches. Search Path Configuration Dialog Box Update button 3 Updates the directory tree for the local host.
2.2 Registering and Specifying Search Folders 4. Select a folder and click Add, or double-click the folder number. The host name and ID of the specified folder appear in the Search paths area (with check box selected). Select to assign folders to be searched Drag to change the column width Explanation Host List The Host List displays any hosts on the network that are running DataBrowser. Up to two hundred hosts can be displayed.
2.2 Registering and Specifying Search Folders 1 Enter folder ID 2 Operation of the Data Search Window 3 2. Enter a folder ID and click the Add button. The host name and ID of the registered folder appears in the Search paths area (the folder’s check box is selected, indicating that it will be included in any searches performed). Explanation Index Path The Path column shows the absolute path to the folder that was dragged.
2.3 Specifying Search Conditions The following five categories of search criteria can be used. Multiple search conditions can be specified. • Date and/or time range • File name or extension • Data type • Keywords • Serial numbers Specifying a Date and/or Time Range Procedure 1. Specify a search folder. (See section 2.2) 2. Select the Time check box in the Search conditions area. 3. Click the Time tab or click the word “Time” to the right of the check box. The Time tab is displayed.
2.3 Specifying Search Conditions 1 Specifying a File Name or Extension Procedure 1. Specify a search folder. (See section 2.2) 2 2. Select the File Name check box in the Search conditions area. Operation of the Data Search Window 3. Click the File Name tab or click the words “File Name” to the right of the check 3 box. The File Name tab is displayed. Check box 4 Index Click to the right of each item to change the tabs on the right. 4. Select the File Name or Extension option. 5.
2.3 Specifying Search Conditions Specifying Data Types Procedure 1. Specify a search folder. (See section 2.2) 2. Select the Data Type check box in the Search conditions area. 3. Click the Data Type tab or click the word “Data Type” to the right of the check box. The Data Type tab is displayed. Check box Click to the right of each item to change the tabs on the right. 4. Select the types of data to search for.
2.3 Specifying Search Conditions 1 Explanation Keyword specification allows you to search for files that contain the keywords in their text or data. Files that do not contain any data of the specified search key are not included in the search. The table below shows the types of data available by product.
2.3 Specifying Search Conditions Specifying Search Conditions Explanation Specifying Multiple Search Conditions You can apply multiple or even all entered search conditions to the same search, including date and/or time, file name, data type, keyword, and serial number. As in the figure below, the major search categories are combined in an AND relationship, and the conditions within each category are applied in an OR relationship.
2.4 1 Executing the Search Procedure 1. Specify search folders and search conditions. 2 (See sections 2.2 and 2.3) Operation of the Data Search Window 2. Click the Search button in the Search conditions area. (Select the Search 3 subfolders check box if necessary. 4 The Search status dialog box appears. Index Click to view contents of the error Changes to the Close button when the serach stop.
2.5 Displaying Search Results Displaying the Search Status Procedure 1. When a registered folder is searched with specified conditions, the search results are displayed in the Search results area. Registering Search Folders (section 2.2), Specifying Search Conditions (section 2.3), Executing the Search (section 2.
2.5 Displaying Search Results Specifying Pages One hundred search results are displayed on a single page. If several pages are generated, you can access other pages by clicking the arrow buttons in the upper right of the Search results area. Open button Save button 3 Saves the currently displayed search results. (See section 2.6) Sort Function You can sort the search results by various items.
2.5 Displaying Search Results Displaying File Details Procedure 1. Click a file in the search results area to display its details in the File Details area. Click the tag display switching buttons to display the channel, Tag No., or Tag comment. Show the file information display button Tag display switching buttons Explanation Host Name [Folder ID] Displays the host name and folder ID. Channels Displays the number of channels in the current file.
2.5 Displaying Search Results Note Tag numbers and serial numbers are not displayed for the following data types. Tag numbers CX1000/2000, DX100/200, MV100/200, FX100 Serial numbers DAQLOGGER, AddMulti, AddTrigger, MX100 Serial numbers are also not displayed for computation-only data from the MX100, and for data saved by Viewer. 1 2 Operation of the Data Search Window 3 “Show the file information display” button Click this button to display the Datafile Information dialog box for the found file.
2.6 Adding Channels from Search Results to the Trend Display Window The following describes the procedure for adding channels from the search results to the Trend display window. Collectively Adding a Selected Range of Channels Procedure 1. Select a file from the search results area to display its details. (See section 2.5) 2. Select a range of channels to add and click the Add channels to this trend configuration button.
2.7 1 Saving and Loading Search Settings and Results Saving Search Settings 2 Procedure on the toolbar or choose File> Save search settings as from the menu bar. The Save search settings dialog box appears. Delete button Update button 3 4 Index Drag to change the column width Search settings file icon 2. Enter a file name and comment and click the Save button. The currently specified search folder and search conditions are saved.
2.7 Saving and Loading Search Settings and Results Opening Search Settings from a Local Host Procedure 1. Click on the toolbar or choose File> Open from the menu bar. The Open dialog box is displayed. Delete button Update button Drag to change the column width Double-click a number to open the file 2. Select a file and click Open, or double-click the file number. The Information dialog box opens. 3. Click the Yes button.
2.7 Saving and Loading Search Settings and Results 1 Opening Search Settings from a Network Host Procedure 1. Click 2 2. Click the Hosts on network tab. The Hosts on network tab is displayed. Operation of the Data Search Window on the toolbar or choose File> Open from the menu bar. The Open dialog box is displayed. 3 3. Click the Update button. The names of hosts running DataBrowser, and their corresponding files names and comments are displayed.
2.7 Saving and Loading Search Settings and Results Saving Search Results Procedure 1. Click the Save button in Search results area or choose File> Save the search results as from the menu bar. The Save dialog box appears. Delete button Update button Drag to change the column width 2. Enter a file name and comment and click the Save button. The displayed search results are saved. Explanation File List Displays the name of the search results file and comments saved on the local host.
2.7 Saving and Loading Search Settings and Results 1 Opening Search Results from a Local Host Procedure 1. Click the Open button in Search results area or choose File> Open the search results from the menu bar. The Open dialog box is displayed. Operation of the Data Search Window Delete button 3 Update button 4 Drag to change the column width Double-click a number to open the file Index 2. Select a file and click Open, or double-click the file number. The Information dialog box opens.
2.7 Saving and Loading Search Settings and Results Opening Search Results from a Network Host Procedure 1. Click the Open button in Search results area or choose File> Open the search results from the menu bar. The Open dialog box is displayed. 2. Click the Hosts on network tab. The Hosts on network tab is displayed. 3. Click the Update button. The names of hosts running DataBrowser, and their corresponding files names and comments are displayed.
2.8 1 Copying Data Files This section describes the procedure for copying a data file from a specified folder to another folder. 2 1. Click on the toolbar or choose File > Import Data Files from the menu bar. The Import Data files dialog box opens. 3 4 Index 2. Click the Select button for the Source. The Browse for Folders dialog box is displayed. 3. Select a source folder and click the OK button. The Import Data files dialog box reappears. 4.
2.8 Copying Data Files 5. Select a location in which to create a new folder, and click the New Folder button. The Create New Folder dialog box is displayed. 6. Enter the name of the folder to be created, and click the OK button. The Browse Folders dialog box is displayed (the screen in step 4). 7. Select the destination folder and click the OK button. The Import Data files dialog box reappears. 8. Click the Start button.
Chapter 3 3.1 Operation of the Trend Display Window 1 Names of Parts in the Trend Display Window The Trend display window consists of the display channel settings screen and the waveform display screen. 2 Opening the Trend Display Window 3 Procedure on the toolbar or choose View> Trend display from the menu bar. The Trend display window opens.
3.1 Names of Parts in the Trend Display Window Explanation Group Name You can specify a group name using up to thirty alphanumeric characters. No. Number assigned within groups. Channel, Tag Number, and Tag Comment Displays identifiers for the channels (display can be switched using the group tab tool bar). Start Time Time of the first data. End Time Time of the last data. Trigger Time Time of the trigger point (if no trigger point exists, the first data is used.
3.1 Names of Parts in the Trend Display Window 1 Editing Functions in the Channel Display Configure Screen Click to select all Copy Paste 2 3 Operation of the Trend Display Window Drag to select a range 4 Click to select for Copying/Pasting. The flaf is display. Click this button to turn all select buttons ON/OFF collectively Click this button to set all to the same as the top of the selection Click this button to reset to default Copy Copies the selected range to the clipboard.
3.1 Names of Parts in the Trend Display Window Waveform Display Screen Displays the waveforms of the channels in the channel information screen. Menu bar Toolbar Waveform Display Screen Toolbar Waveform Display Screen Toolbar Linked group settings (OFF, 1, 2, 3, 4) Switches between Channel, Tag No.
3.2 1 Selecting a Group for Adding Channels Channels can be assigned to groups in the channel display configure screen. Up to fifty groups can be created, each with up to thirty-two channels. When channels are added in the Search window (see section 2.6) they are added to the selected groups. Adding and Deleting Groups button in either of the channel setup screens deletes the currently Clicking the displayed group tab.
3.3 Settings in the Channel Setup Screens Procedure You can edit display settings by following the indications in the figure below. Swich between the display channel settings screen and waveform display screen Set linked groups (OFF, 1, 2, 3, 4) Add/delete/move forward/backward groups Display channel details.
3.3 Settings in the Channel Setup Screens 1 Minimum and Maximum Values of Scale, and the indstart Scale Value Display Format instop You can set the maximum and minimum values of the scale when displaying waveforms. The value in the Scale Min column is the lower end of the Y-axis, and that of the Scale Max column is the upper end. In the Form. column, you can specify floating point or exponential format for the scale values.
3.3 Settings in the Channel Setup Screens Channel Display Colors You can assign colors to channels displayed in the trend display screen. Click the colored part to open the Color Settings dialog box. Showing Channel Details You can view detailed information about a channel selected in the channel setup screens. • Click opens. in the channel setup screen toolbar.
3.4 1 Displaying Trends Displays waveforms according to the settings in the channel setup screens. 2 Procedure 1. Click the Show the trend display button in either of the channel setup screens. 3 Operation of the Trend Display Window The channels selected in the tab are loaded. While loading, the “Receiving”dialog box is displayed, and when complete, the waveforms appear (click the Cancel button to stop the loading process.
3.4 Displaying Trends Explanation Group Selection Tabs Click a tab to display the group. The name displayed is the one specified in the channel setup screen. Waveform Display Area The area in which the waveforms are displayed. Displays waveforms according to the settings in the channel setup screens. Click in the waveform display area to display a cursor. Drag the cursor to display a second cursor.
3.4 Displaying Trends Time Axis Display Area • The time display shows the time of the channel. When the time reference mode is Start Reference, Trigger Reference, or End Reference, the time of the active channel is displayed. • The time display shows the time relative to the start of the waveform display area. 1 2 Showing Channel Details In the Trend display screen, the information of the active channel is displayed.
3.4 Displaying Trends Time Reference Mode There are four time reference modes: Start Reference, Trigger Reference, End Reference, and Time Reference. Start Reference Waveforms are displayed using the first data of the channels assigned to the group as a reference. Trigger Reference Waveforms are displayed using the trigger point of the channels assigned to the group as a reference. End Reference Waveforms are displayed using the last data of the channels assigned to the group as a reference.
3.4 Displaying Trends Waveform Display in Normal Format indstop and indstart MinMax Format In Normal format, waveforms are displayed in the position corresponding to the data value at that time. In MinMax format, waveforms are displayed as a fill between the two points corresponding to the Min and Max values at that time. When the Min and Max values are the same, items are displayed as if in Normal format. If the difference between the Min and Max values is large, the thickness of the trace increases.
3.4 Displaying Trends Edit Zone The waveform of each channel is displayed in the position specified under Zone in the Channel Display Configuration Screen. You can edit the waveform display range by manipulating the Y-axis buttons in the zone display area. Move the waveform position by dragging the Y-axis button up and down. The waveform zone settings implemented here are reflected in the Zone setting in the Channel display configuration screen, as well as the user zone and multi-zone settings.
3.4 Displaying Trends Auto Zone Displays the waveforms by dividing the waveform display area evenly according to the number of displayed waveforms regardless of the Zone settings in the Channel display configuration screen. Active Y-axis mark 1 2 3 Operation of the Trend Display Window Automatically displays the waveformin equal divisions 4 Index Multi-Zone Arranges all the Y-axes from left to right, displaying all specified Y-axes.
3.4 Displaying Trends Trip Point The trip points are displayed according to the Trip 1 and Trip 2 settings in the Channel display configuration screen. You can drag the trip 1 and trip 2 displays to change them. These changes are reflected in the Trip 1 and Trip 2 items in the Channel display configuration screen. Trip 1 Trip 2 You can change the trip point by dragging Copying the Trend Display Clicking the XX button (copy button) in the Trend display toolbar copies the displayed trend screen.
3.5 1 Displaying Cursor Values Procedure 1. In the waveform display, click the group from which you wish to read values using 2 cursors. 2. Click the position in the waveform display area where you wish to read the data. Cursor B 3. Click the Display Cursor Rearout button on the toolbar. The Cursor Readout dialog box opens.
3.5 Displaying Cursor Values Normal and MinMax Format Display Values of channels In Normal format are displayed in a single row. Values of channels in MinMax format are displayed in two rows, one for the minimum and maximum value at the cursor position. Switching the Active Channel You can switch the active channel. The active channel mark is displayed between the waveform number and its color. Click the box of the channel you wish to make active.
3.6 1 Displaying Computed Results (Statistics) Procedure 1. In the waveform display screen, click the tab of the group on which you wish to 2 perform statistical computation over an area. 2. Click the start point of the computation area in the waveform display area, then drag the cursor to define the area and end point (use the cursor in the same manner as in section 3.5, ìDisplaying Cursor Values.” Operation of the Trend Display Window 3. Click the Statistics button on the toolbar.
3.7 Saving and Loading Trend Settings Saving Data Trend Settings Procedure 1. Click (the Save button) in the DataBrowser window or choose File > Save current trend configuration as from the menu bar. The Save the trend settings dialog box appears. Delete button Update button Drag to change the column width 2. Enter a file name and comment and click the Save button. The currently displayed trend settings are saved.
3.7 Saving and Loading Trend Settings 1 Opening Trend Settings from a Local Host Procedure 1. Click (the Open button) in the DataBrowser window or choose File> Open from the menu bar. The Open dialog box is displayed. 2 Delete button 3 Update button Operation of the Trend Display Window 4 Drag to change the column width Double-click a number to open the file Index 2. Select a file and click Open, or double-click the file number. The Information dialog box opens. 3.
3.7 Saving and Loading Trend Settings Opening Trend Settings indstop from a Network Host Procedure 1. Click on the toolbar or choose File> Open from the menu bar. The Open dialog box is displayed. 2. Click the Hosts on network tab. The Hosts on network tab is displayed. 3. Click the Update button. The names of hosts running DataBrowser, and their corresponding files names and comments are displayed. Update button Double-click a number to open the file Drag to change the column width 4.
3.8 1 Converting Data Formats Procedure 1. Open the waveform display screen and display the waveforms of the data you 2 wish to convert. 2. Select a range to convert using the cursors (if no cursors are displayed all data Select the check box of the desired conversion type to turn it ON 4 Index 3. Select a conversion type of Excel, Text, or Lotus. To change the range of data to be converted, specify a Start and End point. 4. Enter the number of steps. (See Explanation for details.) 5.
3.8 Converting Data Formats 8. Enter a destination folder and file name and click the OK button. The name of the output file appears in the Data Conversion dialog box. 9. Click the Start button. Explanation Conversion Type Excel Data that can be opened using Microsoft’s spreadsheet application Excel version 8.0 (Excel97) or later. The extension is .xls. Text Text data with each data point separated by a comma. The extension is .txt.
3.8 Converting Data Formats The figure below shows an example of output when the Write Measured point of the following channel check box is not selected, the smallest unit interval (reference interval) is 0.5 s, and the number of steps is 1 (if the steps were set to 3, samples would be output every 1.5 s). Minimum unit interval (0.5s) CH01(1.5s) CH02(0.5s) CH03(1.0s) CH04(2.0s) CH05(1.5s) 3 Output (0.
3.8 Converting Data Formats Automatic Division Function for Conversion Output Files If the number of points to be converted and output is large and you attempt to save all the points to a single file, the file will exceed the allowable number of rows in Excel or Lotus 1-2-3, making the file unloadable. The Automatic Division function automatically creates multiple files that are within the row number limit of Excel and Lotus 1-2-3.
3.9 1 Printing Data Printing 2 Procedure 1. Open the waveform display screen. 2. Click (the Print button) on the toolbar or choose File > Print from the menu bar. The Printout settings dialog box opens. 3 Operation of the Trend Display Window 4 Index Enter a comment to be printed (of up to 255 alphanumeric characters) 3. Select a print range and color, and enter a print title. Click the OK button. The Print dialog box opens. 4. Click the OK button.
3.9 Printing Data Explanation You can print cursor values and statistics along with waveforms from the trend display screen. To print cursor values and waveforms, open the Cursor Value dialog box before printing. To print statistics, open the Statistics dialog box before printing. To print cursor values and statistics, open both dialog boxes before printing. Print Range Choose from Between Cursors and All.
Chapter 4 4.1 Troubleshooting 1 Error Messages and Corrective Actions A message (such as an error message) may appear during operation. The following describes the meanings of the messages and their corrective actions. Code E0002 E0004 E0101 Description Insufficient memory. Please close at once. Invalid license number. Please reinstall. Please open from the DataBrowser. E4948 M4959 Could not initialize communications. Cannot exit while DataBrowser is starting up.
4.1 Error Messages and Corrective Actions Code E4947 Description DataBrowser not found. E4956 The number of data files that meet the criterion exceeded the limit. Corrective Action Software may be running on the same port (50285) used by DataBrowser. Check the host on which the error occured. If the number of data files that meet the search the upper limit of 60000, narrow down your search conditions and perform the search again.
Index Index 1 A L adding and deleting groups................................................... 3-5 adding channels.................................................................. 2-16 automatic division function.................................................. 3-26 auto zone............................................................................. 3-15 linked group settings............................................................. 3-5 C channel display configure screen......................
Index U user zone............................................................................. 3-13 V viewing a print preview........................................................ 3-27 W waveform display area........................................................ 3-10 waveform display screen....................................................... 3-4 waveform display zones........................................................ 3-7 Y Y-axis display......................................................