
Instruction Manual


8-8
IM WX102-01E
Set the Calibration Value to a Previously Decided Value
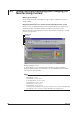
1.
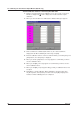
Click the connection button in the calibration screen. The system of connected
DA100s is displayed. A [
] mark is displayed on modules that don’t require
calibration.
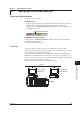
2.
When you click a module to be calibrated, the calibration dialog box appears.
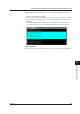
3.
Click a terminal to be calibrated (CH1, CH2, etc.) the selected terminal is
displayed in red. When calibrating the entire range, click [All].
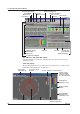
4.
Enter the calibration value for each Zero and FULL. When you click the [Zero] and
[FULL] buttons, the setting range is displayed.
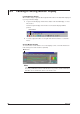
5.
When you click the [start] button, a message appears to confirm that you wish to
save the calibration values.
6.
When you click [OK], a message appears to reconfirm that you wish to save the
current calibration values.
7.
When you click [OK], a report appears telling you that you calibration values were
accepted.
8.
Click [OK] to conclude calibration. When calibrating a separate module, click
the [Close] button, and repeat the procedure from step 2. [OK] is displayed on
modules for which calibrating has been completed.
8.4 Calibrating the Transmission Output Module (DA, DC only)