
Instruction Manual


8-3
IM WX102-01E
1
2
3
4
5
6
7
8
9
10
11
Index
Calibration
5
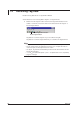
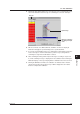
Clicking the Start button displays the connection type of the terminal and the input
value in an illustration and a message for confirming the connection and input.
Auto tab
Message confirming
the wiring and input
value
Input voltage
6
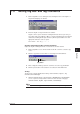
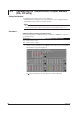
Wire the terminals of the DA100, DC100, and DR as shown in the displayed
illustration and apply the specified voltage to the specified terminal.
7
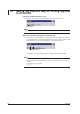
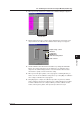
If you had selected multiple ranges to be calibrated, the wiring and the input value
for the next range is shown in an illustration, just like in step 5, along with the
confirming message when the OK button is clicked.
8
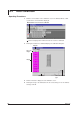
After confirming the wiring and the input for all ranges according to steps 5 and
6, a final confirming message is displayed to fix the calibration value. Clicking the
OK button displays a message notifying that the calibration value has been fixed.
9
Clicking the OK button terminates the calibration. To calibrate another module,
click the Close button and repeat from step 2. OK is displayed for the modules
that have completed the calibration.
8.2 Auto Calibration