
Instruction Manual


6-31
IM WX102-01E
1
2
3
4
5
6
7
8
9
10
11
Index
Historical Viewer Software
Note
• You can also enter or change the print title in the File Information dialog box. (Refer to
Viewing file info on 6-4 page) The print title entered or changed here will reflect to the File
Information dialog box.
• The Print Title can be up to 255 characters. However, make sure it fits on the paper printout.
4
Click OK to save the settings and close the dialog box.
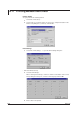
• Table Printout Setup
2
Click the Table Printout Setup tab.
3
Select All values or the Cursor specified values as printing Range.
4
Click OK to save the settings and close the dialog box.
Note
The printing range is set using cursor A and B, as explained in Section 6.6, “Cursor
Measurement.”
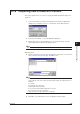
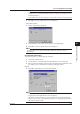
Print Preview and Printing
To preview the pages you want to print, do as follows:
1
Select File > Print Preview.
2
Use the buttons on top of the Print Preview window to zoom or turn pages.
3
When you finish previewing, either click Close the Print Preview window to return
the original screen or click Print to continue the printing procedure.
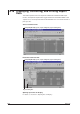
Printing
4
Click OK to start printing, or Cancel to abort printing.
Note
• The print preview starts with the first file data.
• The print preview may slightly differ from the actual printout.
• Refer to the instruction manual of your own PC for further info on print preview operation.
• When the Cursor’s Value or Calculate Results windows are on display when printing, those
values will also appear on print.
6.17 Printing Measurement Data