2940-010 COULTER & RESIDUE MANAGER COMBO INSTALLATION GUIDE 2565-778 01/2014 *PATENT PENDING* YETTER MANUFACTURING CO. FOUNDED 1930 Colchester, IL 62326-0358 Toll free: 800/447-5777 309/776-3222 (Fax) Website: www.yetterco.com E-mail: info@yetterco.
FOREWARD You’ve just joined an exclusive but rapidly growing club. For our part, we want to welcome you to the group and thank you for buying a Yetter product. We hope your new Yetter products will help you achieve both goals-increase your productivity and increase your efficiency so that you may generate more profit. This operator’s manual has been designed into four major sections: Foreword, Safety Precautions, Installation Instructions and Parts Breakdown.
SAFETY A brief description of signal words that may be used in this manual: CAUTION: Used as a general reminder of good safety practices or to direct attention to unsafe practices. WARNING: Denotes a specific potential hazard. DANGER: Denotes the most serious specific potential hazard. SAFETY PRECAUTIONS You can make your farm a safer place to live and work if you observe the safety precautions given. Study these precautions carefully and insist that those working with you and for you follow them.
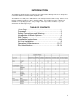
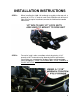
INTRODUCTION The 2940-010 Unit Mounted Conservation Coulter and Residue Manager have been designed as a ‘universal’ fitment for several makes of planter units. The 2940-191 assembly of the 2940-010 has a mounting bracket that will correctly attach to most planters including John Deere, Kinze, and Agco White. Several different styles of blades are available for every tillage practice, every soil type, and every residue condition, so you can choose the one that’s right for you.
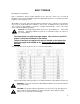
BOLT TORQUE Mounting bolts and hardware Before operating the Titan Residue Manager for the first time, check to be sure that all hardware is tight. Check all hardware again after approximately 50 hours of operation and at the beginning of each planting season. All hardware used on the Titan Residue Manager is Grade 5 unless otherwise noted. Grade 5 cap screws are marked with three radial lines on the head.
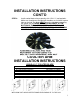
INSTALLATION INSTRUCTIONS STEP 1: When installing the 2940-191 combo air assembly to the row unit, a quantity of 3-1/2”x1 ½” bolts is used. Each OEM row unit will have 3 holes that line up for installment to make the 2940 coulter combo mount level. STEP 2: For easier install, make sure elbow swivels by placing 11/16” wrench on NPT end and turning elbow by hand a few rotations. Once fittings are started on the air bag, tighten until thread tape almost disappears.
INSTALLATION INSTRUCTIONS CONT’D STEP 3: Install coulter blade using a quantity of 4-1/2”x1 ¼” carriage bolts. Make sure shoulder on carriage bolt shoulders rest inside of square hole on the hub. The blade MUST be on the hub before mounting the coulter arm. IF USING SETTING #2 ON CHART AT THE BOTTOM OF THE PAGE FOR DEPTH, LEAVE THE BLADE LOOSE ON THE HUB IN ORDER TO INSTALL COULTER ARM MOUNTING BOLT CLOSEST TO THE BLADE.
STEP 4: Install coulter and arm assembly in desired setting using a quantity of 2-5/8”x2 bolts and 2-5/8” hex jam locknuts. Adjustment: Adjust coulter blade depth equal to or above the planter opener blades. Adjust the blade depth as required for blade wear. Planter blades that are worn to 14 ¼” or smaller in diameter should be replaced. Example: 14 ¼” blades will have a 3/8” shallower planting depth than 15” blades at the same gauge wheel adjustment setting.
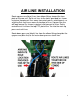
AIR LINE INSTALLATION Route up pressure (blue) lines from elbow fittings toward the face plate of the row unit. Zip tie air lines to the holes provided (as shown in picture) keeping air lines away from pinch points, rotating parts, or anything that may cause wear or damage to lines. Up pressure line will loop around (as shown in picture) and connect to a tee. Safely route blue air line from the top PTC port of the Tee into the main up pressure trunk lines.
OPERATION 1. Set/mount coulter blades to run perpendicular to the soil. Operation depth and blade wear can be affected if the coulter is mounted crooked or if the toolbar is not level side to side. 2. After a few hours of use, check all bolts for tightness and proper torque. 3. After a day of use (10-12 hours) check coulter hubs for loose bearings. There should be no endplay in the hub bearings allowing the blade to wobble.
2940-191 PART IDENTIFICATION 11
2940-010 PART IDENTIFICATION 12
2960-133 PART IDENTIFICATION 13
2565-778 01/2014 14