
Operating instructions


28
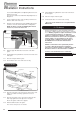
Leg
Cap
Head
Screws
View Underneath
Appliance
5
IMPORTANT: IT IS ESSENTIAL THAT THE
BRACKET AND SCREWS ARE REPLACED ON
COMPLETION OF THIS OPERATION IN ORDER TO
RESEAL THE FIREBOX BEFORE NEXT USE.
6. Adjusting the Door Catch - All Models
Alterations should only be carried out by a competent
person if the door does not effectively seal and adjustment
is required.
1 Door Models:
The following parts
can be altered
Lock Nut
Catch shaft
Catch stub
6
6.1 The door catch can be adjusted as required to achieve
effective sealing.
It is also possible to adjust the catch to ensure the handle
aligns vertically when shut.
6.2 The catch is held in place by a screw thread which can be
turned to tighten or loosen.
Following alteration ensure the stub sits at 90° to the door
knob to ensure the door knob is in a vertical position when
the door is shut.
Lock the nut and catch stub tightly together to fix this
position.
Maintenance & Servicing
Use 2 x 13A/F ring spanners as shown
Note: This should only be carried out
by a competent person.
To loosen
7
Wind clockwise to
tighten door gap
Wind anti-clockwise
to widen door gap
Ensure 90°
when tight
8
2 Door Models:
6.3 This process is the same for 1 and 2 door models, however
on2doormodelsthecatchmustsitverticalat90˚tothetop
of the door.
9
7. Fitting & Removing the Canopy
The appliance is supplied with Flat Top, Low Canopy and
High Canopy options.
7.1 If the appliance is to be fitted with a different top it must be
fitted before installation.
7.2 To fit the canopy:
—Remove the 4 x M8 fixing nuts and washers on the inside
of stove and retain for later use.
—Lift off the Top Plate and place carefully to one side.
Take care not to damage the fixing studs.
Note: These parts are heavy.