
Operating instructions


27
4.4 Clean the locating groove with a clean, dry cloth to remove
all old dust and debris.
4.5 Squeeze a generous bead of fresh Stovax Thermic Seal
glue into the rope locating groove.
4.6 Press the new rope into the locating groove, placing the joint
in the middle of the lower edge of the door (one door
version only).
4.7 Refit door and close to apply pressure to new rope.
4.8 Leave the door(s) closed for at least 12 hours before lighting
the appliance and run at a low temperature for
approximately one day. This allows the adhesive to fully
bond to the seal.
4.9 Using the appliance with a damaged door seal can cause
dangerous fumes to enter the room, or the appliance to over
fire resulting in damage.
5. Adjusting the Door Hinges
Exmoor Models
5.1 To maintain the safe use of your appliance, you may need to
adjust the door hinges to ensure the door closes safely and
correctly.
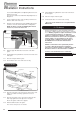
5.2 To complete this operation:
Open the door to give access to the fixed part of the door
hinge as shown.
Fixing Nut
Fixing Nut
5
Use a 13mm A/F spanner to loosen the fixing nuts.
5.3 Reposition the hinge bolts to achieve a correct fit.
This may require several adjustments to find the correct
position
Once the desired position has been achieved ensure the
fixing nuts are firmly tightened to maintain the position.
Exe, Devon & County Models
5.4 To maintain the safe use of your appliance, you may need to
adjust the door hinges to ensure the door closes safely and
correctly. There are 2 screws that allow adjustment.
The larger screw gives front and back adjustment of the
hinge blocks to achieve a good seal between the door and
the appliance body.
The second smaller screw enables finer adjustment of the
door position by allowing the hinge blocks to pivot. The mid
point where the 2 doors meet, or where a single door meets
the door catch, can be adjusted.
To complete this operation:
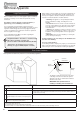
5.5 Open the door to give access to the fixed part of the door
hinge as shown.
Fine
adjustment
screw
Hex
Head
Bolt
5
5.6 Use a spanner to loosen the back Hex head bolts
5.7 Use a 2.5mm A/F hex key to loosen the Fine Adjustment
Screw.
5.8 Reposition the doors to the desired location.
5.9 Position the hinge blocks to achieve a correct fit.
This may require several adjustments.
NOTE: It is recommended to correctly position the top
hinges first.
5.10 Once the desired position has been achieved firmly tighten
the bolts and then the Fine Adjustment Screw to secure
hinge blocks in place.
Note:
If difficulty is experienced in accessing the lower hinge
blocks, it is possible to loosen or remove the log guard
brackets to ease access. To do this, undo the 2 cap head
screws in the base of the appliance, behind the front legs
and lift out the log guard bracket from inside the appliance.
Not applicable to Exmoor models.
Maintenance & Servicing