
Operating instructions


22
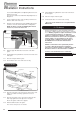
Connect the Riddling Arm to the Operating Rod and secure
with the 2 lock nuts.
The nuts must sit above and below the Operating Rod, see
Diagram 9.
2.7 Set the rotational position of the operating rod and secure
with the small screw on the end.
2.8 Angle the Centre Grate and hook the Riddling Arm into the
slot at the end of the Centre Grate Arm, see Diagram 9.
NOTE: For Exmoor models the Riddling Arm must fit
into the slot, not the hole at the end.
Centre Grate
Riddling Arm
Operating Rod
Lock Nuts
Screw
9
2.9 Refit the upper Firebricks above the sides of the main
grate*.
2.10 Fit the Multi-fuel Log Guard into slots in the front side of the
main grate.
2.11 Place the ashpan under the grate.
2.12 Check that the door closes and seals correctly.
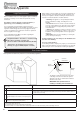
County Model
Rear Grate
Log Guard
Front Grate
Ashpans
10
2.12 Place the rear grate on the steel runners at the sides of the
firebox as far back as it will go against the rear steel
chamber.
2.13 Place the front grate on the steel runners and locate the
back edge against the front edge of the rear grate.
Ensure the grates sit flat on the supports.
2.14 Refit the firebricks above the grate*.
The reverse of the process of removal.
2.15 Fit the Multi-fuel Log Guard into slots in the front sides of
the front grate.
2.16 Place the ashpan under the grate.
2.17 Check that the door closes and seals correctly.
* Note: The 2 lower firebricks are not required with the
Multi-fuel kit.
3. CO Alarms
All open flued appliances can be affected by temporary
atmospheric conditions which may allow fumes to enter the
house. Building regulations require that whenever a new
or replacement fixed solid fuel or wood/biomass
appliance is installed in a dwelling a carbon monoxide
alarm must be fitted in the same room as the appliance.
Further guidance on the installation of the carbon
monoxide alarm is available in the latest edition of
BS EN50292 and from the alarm manufacturer's
instructions.
HETAS recommend the unit is permanently fixed in
accordance with the manufacturer's installation
instructions or with the guidance contained in Approved
Document J where no other information is available.
Provision of an alarm must not be considered a
substitute for either installing the appliance correctly or
ensuring regular servicing and maintenance of the
appliance and chimney system.
Installation Instructions