
Operating instructions


21
Installation Instructions
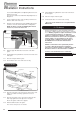
1.3 Rear flue pipe installation
Cap
Self Tapping Screw
Seal Collar with Fire Cement
Tee
Size Part No.
5" 4516
6" 4616
5
— Insert a tee into the flue collar.
If installing a County product, with either a low or high
canopy, you will have a choice of a rear exit on the back of
the stove or canopy.
The cap supplied with the tee is used as cleaning access.
— Level feet using adjustable bolts.
— Connect tee to the chimney using flue pipe.
— Secure tee to the flue collar with self tapping screw.
— Seal the connecting joints with fire cement.
Donotusea90˚elbowtomakethisconnection.
The Flue must be installed in accordance with
manufacturers instructions.
Typical Rear Flue Installation
600mm minimum
1000mm maximum
unsupportable weight
To chimney connection as
detailed in building regulations
Elbow
Size Part No.
5" 4512
6" 4612
Flue Pipe 915mm (3ft)
Size Part No.
5" 4502
6" 4602
6
2. Fitting the Multi-fuel kit
Exmoor M/F Kit - YM-EXM-MFKIT fits all Exmoor products
Exe M/F Kit - YM-EXE-MFKIT fits all Exe products
Devon M/F Kit - YM-DEV-MFKIT fits all Devon products
County M/F Kit - YM-COU-MFKIT fits all County products
2.1 This section covers the fitting of the optional multi-fuel kit to
a wood burning appliance, in order to burn manufactured
smokeless fuels as listed in the User Instructions.
Remove the Log Guard if fitted and store safely.
A different Multi-fuel Log guard is supplied with the multi-fuel
kit.
Remove the Firebricks.
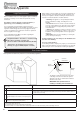
Remove the blanking bolt covering the grate Operating Rod
hole. This is located on the front of the appliance near the
lower right hand corner of the door (not applicable for County
models).
Loosen the M8 nut on the inside of the stove and remove the
washer. The blanking bolt can now be removed from the front
of the appliance.
Blanking
Bolt
7
Exmoor, Exe & Devon Models
Centre Grate
Riddling Rod
Screw
Lock Nut
Lock Nut
Operating Knob
Main Grate
Ashpan
8
2.2 Place the main grate onto the steel runners in the sides of
the appliance.
Ensure that the grate sits flat on the supports.
2.3 Feed the Operating Rod through the hole in the front of the
appliance from outside the firebox.