
Operating instructions


19
Pre-Installation Instructions
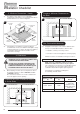
4.4 The front lip of the Baffle should point downwards.
Baffle Extension
Tubes
Support Pin
Rear Lip
3
4.5 Lift the Baffle and slide the two baffle extension tubes off of
the support pins on the sides of the firebox.
4.6 Lift and slide the baffle to one side and lower.
4.7 The Baffle can now be manoeuvred through the front of the
firebox.
Front Lip
3
4.8 Do not modify the baffle.
4.9 Fitting is the reverse of the above.
IMPORTANT: Ensure the Baffle Extension Tubes are
fitted correctly before using the appliance.
5. Removal of the Multi-fuel Grate
5.1 Remove the Ashpan.
5.2 Remove the Log Guard, see Section 2.
5.3 Remove the Firebricks, see Section 3.
Exmoor, Exe & Devon Models
5.4 Lift the Centre Grate at an angle in order to unhook the
Riddling Arm. Remove the Centre Grate, see Diagram 4.
4
5.5 Lift and remove the main grate - This will give better access
to the Riddling Arm.
5.6 Remove the small screw from the end of the Operating Rod.
5.7 Undo the bottom retaining lock nut inside the appliance.
Lift the riddling arm clear and remove the Operating Rod from
the front of the appliance, see Diagram 5.
Centre Grate
Riddling Arm
Operating Rod
Lock Nuts
Screw
5
5.9 Replace in reverse order.
Note: When fitting the Centre Grate replace at an angle
and ensure that the Riddling Arm locates in the hole in
the Centre Grate, see Diagram 4 above.
County Model
5.9 Lift and remove the front grate.
5.10 Repeat to remove the rear grate.
5.11 Replace in reverse order.
Note: When fitting the grate sections ensure that they
site flat on the appliance side supports.
IMPORTANT: THESE GRATE SECTIONS ARE
MADE FROM CAST IRON. USE CAUTION WHEN
INSTALLING,REMOVINGANDSTORINGASTHE
COMPONENTSAREHEAVYANDSHOULDBE
HANDLED CAREFULLY.
.