IP DECT Phone W56P & W56H Quick Start Guide(V81.10) www.yealink.com Applies to firmware version 25.81.0.10 or later.
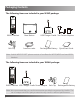
PackagingContents Contents Packaging The following items are included in your W56P package: W56H Handset Belt Clip Base Station Ethernet Cable USB Charger Cradle Two Power Adapters Rechargeable Battery Quick Start Guide Note: Yealink W56P IP DECT phone consists of one Base for W52P/W56P and one W56H Handset.
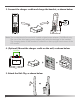
The following item is an optional accessory: W56H Handset Protective Case Note: You need to purchase it separately if required. Assembling Phone Assemblingthe theDECT Phone 1. Connect the network and power for the base station in one of the following ways, as shown below: a. AC Power Option b. PoE (Power over Ethernet) Option IEEE 802.3af compliant PoE Hub/Switch Note: If inline power (PoE) is provided, you do not need to connect the power adapter. Make sure the hub/switch is PoE-compliant.
3. Connect the charger cradle and charge the handset, as shown below: Note: The handset should be used with Yealink original power adapter (5V/600mA) only. The use of the third-party power adapter may cause the damage to the handset. The charging status of the handset is indicated on the top right-hand corner of the LCD screen. 4. (Optional) Mount the charger cradle on the wall, as shown below: 36.00mm 36m m 1:1 5.
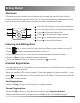
Getting Started Shortcuts This helps you get quick access to features by pressing the shortcut keys directly without scrolling through the menu. You can press the following predefined shortcut keys to access some frequently used features when the handset is idle: 2 2 Press the left soft key to access the call history. Press the right soft key to check the line status. 3 Press 5 4 Press to decrease the ringer volume. 5 Press to increase the ringer volume. 6 Press to access the directory.
searching the base. 3.Press the OK soft key after searching a base successfully. 4.Enter the base PIN (default: 0000), and then press the Done soft key to complete registration. You can also press the OK key to enter the main menu, and then select Settings-> Registration->Register Handset and repeat steps 2-4 to register multiple base stations. Note: After the success of registration, the handset LCD screen prompts “Handset Subscribed” and “Base NO. (last 4 characters of connected Base’s MAC address)” .
Basic Operations Basic Operations Turning Handset On/Off To turn the handset on, do one of the following: Press , then the LCD screen lights up. Place the handset in the charger cradle. The handset will be turned on automatically. To turn the handset off: Long press to turn the handset off. Locking/Unlocking Keypad Long press when the handset is idle to lock the keypad. Long press again to unlock the keypad. Silent Mode Long press when the handset is idle to switch the silent mode to On.
Ring Tones 1.Press the OK key to enter the main menu, and then select Settings->Audio->Ring Tones->Melodies. 2.Press or to highlight the Intercom Call option or the desired line. 3.Press or to select the desired ring tone. 4.Press the Save soft key to accept the change. Local Directory To add a contact: 1.Press the OK key to enter the main menu, and then select Directory. 2.Press the Options soft key, and then select New Contact. 3.
Basic Call Features Placing Calls To place a call directly: 1.Do one of the following: Enter the desired number when the handset is idle. Press to enter the pre-dialing screen. Enter the desired number using the keypad. If there are multiple lines assigned to your handset as outgoing lines, press the Line soft key to select the desired line. If you do not select a line, the handset uses the default outgoing line to dial out. 2.Press , or to dial out. To place a call from the local directory: 1.
Answering Calls To answer a call, do one of the following: Press the Accept soft key. Press . Press . Press . Note: You can ignore an incoming call by pressing the Silence soft key or reject an incoming call by pressing . Ending Calls Press . Call Mute Press during a call to mute the call. Press again to un-mute the call. Call Hold and Resume To place a call on hold: Press the Options soft key during a call, and then select Hold.
2.Enter the number you want to transfer the call to. 3.Press the Transfer soft key. Semi-Attended Transfer 1.Press the Options soft key during a call, and then select Transfer. 2.Enter the number you want to transfer the call to. 3.Press , or to dial out. 4.Press the Transfer soft key when you hear the ring-back tone. Attended Transfer 1.Press the Options soft key during a call, and then select Transfer. 2.Enter the number you want to transfer the call to. 3.Press , or to dial out. 4.
About us Founded in 2001, Yealink, a leading provider of VoIP Phone and IP communication solutions, has been focusing on VoIP products characterized by reliable quality, easy deployment and affordable price for more than a decade. Today, customers from over 140 countries rely on Yealink as the backbone of global collaboration to extend the value of network communications.