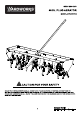
SKU #264-1210 )YARD WORKS 48 IN. PLUG AERATOR MODEL # PA0001-N CAUTION-FOR YOUR SAFETY READ YOUR OPERATOR'S MANUAL COMPLETELY AND CAREFULLY BEFORE ATTEMPTING TO SET UP OR OPERATE YOUR NEW PLUG AERATOR. ALL OPERATORS OF THIS EQUIPMENT SHOULD READ AND UNDERSTAND ALL SAFETY RULES PRINTED ON THE MACHINE AND IN THIS OPERATOR’S MANUAL BEFORE USE.
DO NOT RETURN TO RETAILER THIS ITEM HAS BEEN CAREFULLY INSPECTED AT THE FACTORY FORAY DEFECTS, HOWEVER, IF YOU FIND YOU ARE MISSING ANY PARTS ORA PART IS DEFECTED.
A SAFETY INFORMATION Remember any power equipment can cause injury if operated improperly or if the user does not understand how to operate the equipment. Exercise caution at all times when using power equipment. 1. Read this owner's manual carefully for operating before attempting to assemble or operate this equipment. Be thoroughly familiar with the proper use of this equipment. . Read the towing vehicle owner’s manual and vehicle safety rules. Know how to operate the vehicle before using this equipment.
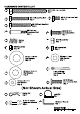
PACKAGE CONTENTS LIST N3 PART# DESCRIPTION QUANTITY PART# DESCRIPTION QUANTITY A Tray 1 J Relay Plate 1 B Control Handle 1 K Side Support Brace 2 C Side Bracket 2 L | Middle Support Brace 1 D Tongue 1 M | Hitch Bracket Kit 1 E Axle 1 N1 | 4.95in. Tube Spacer 2 F Wheel 2 N2 |4.33in. Tube Spacer 1 G Lugger Spool 4 N3 |1in.
HARDWARE CONTENTS LIST o 35"645 mm Hex Bolt @ gflflflmflmflfl mm Hex Bolt @ ununnmmm:mmnummnnummunu | Gzt D <:mlmmm O Qmmm[m Spring M10 Shylock Nut @ WWW Qty: 1 @ } Qty: Shylock Nut H M8 Shylock Nut ° Qty: 22 0 Qty: 4 @ 38mmx19mm 22 mmx 11 mm Flat Washer e Flat Washer Qty: 14 Qty: 1 32mmx 16.5 x50 mm m Flat Washer Hair Cotter Pin Qty: 2 Qty: 19mmx8.
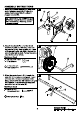
ASSEMBLY INSTRUCTIONS 1. Insert one plastic bearing (O) into each n end of lugger spool (G). Follow the same step to assemble the other 3 lugger spools (G). WARNING: The luggers have sharp edges! Exercise caution while assembling. Wearing gloves is recommended. 2. Attach the wheel (F)onto the wheel bracket (H) with one 32 mm x 16.5 mm flat washer (MM). Secure with one hair cotter pin (NN). Spread the end of cotter pin to lock. Follow the same step for the other wheel. Hardware Used 32mmx16.
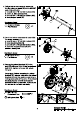
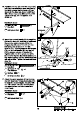
4. Follow below sequence to assemble the first lugger spool (G) to the SHORT end of the axle (E): a: one flat washer (KK). b: one 1in. tube spacer (N3). c:one flat washer (KK). d: one lugger spool (G). Hardware Used 38mmx 19 mm Flat Washer x2 5. Continue below sequence to assemble the wheel bracket (H): a: one flat washer (KK). b: one wheel bracket (H). c:one flat washer (KK). d: one side support brace (K) with platform facing left. Hardware Used 38 mmx19mm Flat Washer x2 6.
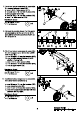
7. Continue below sequence to assemble the second lugger spool (G). a: one 4.95 in. tube spacer (N1). b: one flat washer (KK). c: one lugger spool (G). d: one flat washer (KK). e:one 1in. tube spacer (N3). Hardware Used 38 mmx19mm Flat Washer x2 8. Go back to double check if all the parts are assembled to the short end of the axle (E) in correct sequence shown as the diagram 8. 9. Continue below sequence to assemble the 3rd lugger spool (G) to the LONG end of axle (E): a.one flat washer (KK). b.
11. Make sure the wheel bracket (H) is facing the same way with the one assembled in STEP 6. Secure to the axle (E) with one cross head bolt (EE). Tighten with one M6 nylon nut (JJ). Hardware Used M6 x40 mm Cross head Bolt Shylock Nut Continue below sequence to assemble the 4th lugger spool (G): a.one 4.95in. tube spacer (N1). b. one flat washer (KK). c. one lugger spool (G). d. one flat washer (KK). e.one 1in. tube spacer (N3). Hardware Used 38 mmx 19 mm 2 Flat Washer x 13.
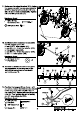
15. Position the tray (A) over the tongue (D) with the front side(side near slot) facing the hitch bracket on the tongue (D) as shown in the diagram. Secure with four hex bolts (BB) and four M8 nylon nuts (I}. Do not tighten until STEP 16. Hardware Used Hex Bolt O vs Shylock Nut Insert the control handle (B) through the slot on the tray with end facing backward.
18. Attach the relay plate (J) to the end of the m control handle (B) with one countersunk bolt (PP), one 19 mmx 8.5 mm flat washer (OO) placed between the relay plate (J) and the control handle (B). Tighten with one M8 nylon nut (I1}. After tightened, loosen the nut by 1/4-1 turns to make sure the relay plate (J) can pivot freely. Hardware Used Countersunk Bolt 19 mmx 8.
21. Connect the relay plate (J) to the control crank (1) with one cross head bolt (FF), one flat wash between the relay plate (J} and control crank (1), tighten with one M8 nylon nut (I1). After tightened, loosen the nut by 1/4-1 turns to allow the relay plate (J) to pivot freely. Hardware Used Cross head Bolt Shylockian Flat Washer @x ! 22. Now the assembly is completed. The m .
23. Before hitching, remove the safety pin FE (QQ) per-assembled and lift up the spring pin to hitch the aerator to the hitch plate on the tractor, then release the spring pin to lock. Always attach the safety pin (QQ) back to secure and prevent accidental release. OPERATING INSTRUCTIONS Plug aerating means pulling out small soil plugs (maximum three inches in length) from the soil to create small reservoirs that will bring oxygen, fertilizer and water down into the roots.
4.Start the vehicle’s engine at low speed to test if the penetrating depth is enough. The recommended depths inches. If the recommended depth can't be reached, some blocks can be added evenly onto the tray to increase the working weight. To keep the working weight stable, use ties to fasten the blocks through the fastening holes on the tray. WARNING: The maximum weight allowed to add is 140 Ib. Do not load over the maximum weight. over-load may cause damage to aerator or cause the aerator to lose control.
PART LIST PART# DESCRIPTION QUANTITY PART# DESCRIPTION A Tray 1 CC |M8 x50 mm Hex Bolt 2 B | Control Handle 1 DD |M8x 16 mm Hex Bolt 12 C |Side Bracket Cross head Bolt 4 D |Tongue 1 FF |M8x 25 mm Cross head Bolt 1 E Axle 1 GG |Spring 1 F Wheel 2 HH | M10 Shylock Nut 1 G Lugger Spool 4 1 M8 Shylock Nut 22 H Wheel Bracket 2 JJ M8 Shylock Nut 4 | Control Crank Flat Washer 14 J Relay Plate Flat Washer 1 K Side Support Brace 16.