
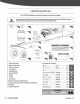
Replacement Part List


2.
Hold the lifting handle and slowly lower
the
beam.
It
will lock
automatically. Double check
to
make sure the beam bracket
is
locked
onto
the beam.
~
Do
not let
the
beam
suddenly
drop.
Keep
hands
and
~
fingers
clear
of
pinch or
crush
points
at
all
times.
Beam
Lock
Bracket
FigureSb
MANUAL
TUBE
1.
Remove the
cap
from
the
manual tube. Align
the
holes in the
manual tube
with
the holes in
the
tow
bar.
Insert and tighten
bolts and washers.
(See
Fipre
9)
Cap
Manual
Tube
Figure9
M8X20
X2
·=-
2.
Reattach the
cap.
LOG
CRADLES
1.
Align the holes on the right log cradle
to
the
inside and lower
holes on the beam mounts. Insert
the
M12x35 bolts,
flat
washers, and nuts and securely tighten.
15 I
Assembly
2.
Follow step 1
to
assemble the left log crad I
e.
(See
Fisure 10)
Figure10
M12X35
xs
LOG
TABLE
(OPTIONAL)
Refer
to
Fipres
10
and 11
to
install the
work
table. Remove
the bolts,
flat
washers, and nuts
from
the inside holes. Move
the log cradle from
the
incline position
to
the horizontal
position. Align the holes
on
the log cradle
with
the
outside
holes on the beam mount. Reinstall
the
bolts,
flat
washers,
and nuts.
Place the
work
table over the holes in the log cradle and align
the 4 holes from
the
work
table plate and log cradle. Insert
and tighten the M 10x25 bolts, spring washers,
flat
washers,
and nuts.
~
M10x25tx4l
WorkTable
Log
Cradle
(Right)
Figure11
M10X25
X4-
YU2566PM02- 1703