
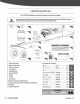
Replacement Part List


8.
Insert the cotter pin through the hole in the axle.
Bend
open
and
spread the prongs in opposite directions
so
the axle nut
will not come
off
(make
sure the
tire
spins freely).
Installation
of
the
cotter
pin
is
important
and
required.
Failure
to
install
the
cotter
pin
can
result
in
loss
of
wheel
retention. Always
assemble
using
a
new
cotter
pin.
Do
not
reuse.
9.
Use
a soft-faced hammer
to
tap the anti-dust washer in the
right position.
10. Align the wheel
cap
against the wheel hub.
Use
a soft-faced
hammer
to
tap the wheel
cap
onto the wheel hub properly.
11. Follow
the
same procedure
to
assemble
the
other
wheel
(follow steps
3-
10 under wheel
assembly.)
BEAM
1.
Hold
and
pull the beam until
the
log cradle mount and
the
beam
is
against the wooden block in-pallet.
Log
Cradle
Mount
Wooden
Block
Figure3a
2.
Slowly
lift
the top
of
the
beam
and
stand the
beam
on the
end
plate in the vertical position.
13 I
Assembly
Figure3b
TOW
BAR
After the
beam
and cylinder
assembly
is
in
the
vertical position, a helper
is
needed
to
prevent
the
beam
from
tipping
over
until
it
is
secured
on
the hydraulic tank
assembly
with the hitch pin
and
R-clip.
The
beam
assembly
is
heavy
and
has
a
small
foot
print.
When
in
the
vertical
position,
the
beam
may
fall, causing
damage
to
the machine
and
could
result
in
personal
injury.
Insert the
tow
bar into the tank pivot mount. Align the holes in
the
tow
bar with the holes in the tank pivot mount. Connect
and
tighten the
tow
bar
to
the tank by using the
M12x90
bolts,
flat
washers, spring washer,
and
nuts.
(See
fisure 4)
Tank
Pivot Mount
2
M12x90(x2)
.
Figure4
@
@)
iJ)
[')
M12X90
X2
-----
SUPPORT
LEG
Lift
the
tow
bar
slightly. Pull
out
the
lock lever and
put
the
support leg in
the
DOWN
position, then release
the
lever and
make
sure the leg
is
secured.
Remove
the bottom pallet.
FigureS
YU2566PM02 · 1703