
Gate Installation And Assembly Guide


YARDGARD SELECT
™
: INSTRUCCIONES DE INSTALACIÓN DEL ARMAZÓN DE LA VALLA YARDGARD SELECT
™
- FENCE FRAMEWORK INSTALLATION INSTRUCTIONS
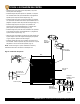
STAGE 3: GATE INSTALLATION
3
• Determinewhichpostwillbethelatchpostandwhichwillbe
thehingepost.
• Looselyinstalltopposthingewithpinpointingupapproximately
8˝fromthetopofthehingepost(Fig.19).
• Looselyinstallself-closingposthingewithpinpointingup
approximately10˝fromthebottomofthehingepost(Fig.19).
• Looselyinstalltopgatehingetogateframeapproximately7˝
fromthetopofthehingepost(Fig.19).
• Looselyinstallself-closinggatehingetogateframeapproxi-
mately7˝fromthebottomofthegate(Fig.19).
• Alignthegatebyplacingitlevelwiththetopofthefence.
Adjustthehingestoallowforfullswing.Tightenallhinges.
• Installgatelatchtothegateframeatthedesiredheight.Install
PVCPostProtectortothelatchpostatwherelatchwillclose.
(Fig.19)
NOTE: Easy-to-installdoublegateanddecorativefencemedal-
lionsareavailableonhomedepot.com.
48"
Fig. 19 Gate Installation
Top
GATEHinge
Top
POSTHinge
Self-Closing
GATE Hinge
Self-Closing
POSTHinge
GateFrame Post
GateLatch
PVC
PostProtector
HingePost
LatchPost
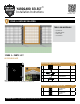
PORTÓN DE CIERRE AUTOMÁTICO
PORTÓN DE CIERRE AUTOMÁTICO (1000-034-737) CANT.
N Portón de 4 pies 1
O
Pestillo del portón 1
P
Bisagras de portón de
cierre automático
1
Q
Protector de poste de PVC 1
Tornillos autorroscantes 5
OPCIONALES (DISPONIBLES EN HOMEDEPOT.COM) CANT.
R
Medallón decorativo
de vallas*
4
Medallón decorativo
de vallas*
1
HERRAMIENTAS Y
MATERIALES
• Cintamétrica
• Llaveajustable
• Taladroinalámbrico
• Aprietatuercasde1/4depulgada
ETAPA 3: LISTA DE PIEZAS
ETAPA 3: INSTALACIÓN DEL PORTÓN
3
*Elmedallóndecorativodevallassevendeporseparadoen
homedepot.com
Instrucciones de instalación del
YARDGARD SELECT
™
Escaneeparaverel
videodeinstalación