
Owner Manual


6
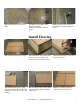
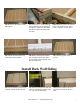
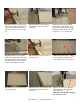
(20) Nail front right corner as
shown, making sure the flooring is
tight against previous piece, then
nail along the splice.
(21) Nail along the front and left
side of the piece, making sure
flooring is flush with the band
board and floor joist.
(19) Center the floor joist evenly
with the flooring splice, then nail
the back right corner, after making
sure flooring is tight against, and
flush with the previous piece.
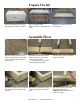
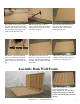
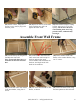
Assemble Back Wall Frame
(25) Locate and lay out the parts to
assemble the back wall.
Note: (Dados are 24” on center)
Single plate belongs towards the
bottom, and double plate towards
the top.
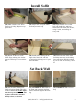
(22) Before you finish attaching
the first row flooring to the joist,
make marks 12” on center for a
guide to adjust the joist when nail-
ing.
(23) Repeat previous steps for
back row, using an 8” to 12” nail
spacing, and ensuring all flooring
is either flush or parallel with the
floor joists.
(24) Finally, make sure flooring is
nailed to all floor joists, then you
are ready for wall placement.
(866) 210-9273 - info@yardcraft.com