
Owner Manual

11
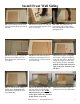
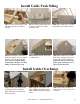
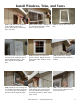
(62) Lay out siding as shown here,
starting with the under lap towards
the right.
(64) Make sure siding has 3/4”
reveal along edge of door frame.
then nail along door frame. Finish
nailing this piece.
(63) Place the siding even with the
center of the double top plate, then
move to next step.
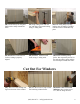
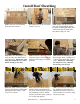
(68) Cut the end of the siding, re-
peating steps (42 and 43) Then,
install soffit, repeating previous
steps (44 to 49)
(69) Set the front wall, again: mak-
ing sure edges of wall are flush
with edges of floor. It is VERY
important that a person holds the
wall in place until wall is attached
firmly to floor, or braced.
(70) Fasten the wall securely, re-
peating previous steps (53 to 55)
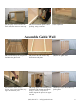
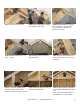
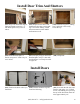
(65) Place the cut piece against the
previous piece, and keep it 3/4”
above door header as shown; be-
fore nailing.
(66) Repeat with the next piece,
making sure the siding has a 3/4”
reveal on the top of door, as done
in previous step.
(67) Fasten the piece on the right
side of door, using the same steps
as the left side of door. Before fas-
tening the last piece, check if the
door opening is square. IF NOT,
pull the bottom of the wall left or
right to adjust it, then fasten the
last piece.
(866) 210-9273 - info@yardcraft.com
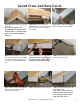
Install Front Wall Siding