
Use and Care Manual


(866) 210-9273 - info@yardcraft.com
7
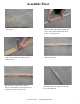
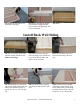
(25) Layout the flooring as shown. (27) Attach the corner of the floor-
ing, using 2” nails.
(26) Start on the front right corner
with a full 4’x8’ piece, making
sure flooring is flush with floor
joists.
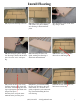
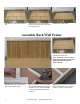
Install Flooring
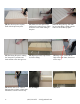
(31) Center the floor joist evenly
with the flooring splice, then nail
the corner, after making sure floor-
ing is tight against, and flush with
the previous piece.
Nail this piece, using the same
methods as the previous piece.
(32) Before you finish attaching
the first row flooring to the joist,
make marks 12” on center for a
guide to adjust the joist when nail-
ing. Then finish nailing the first
row flooring.
(33) Nail the rest of the first row,
then move to next step.
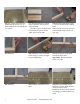
(28) Nail along the gable, making
sure flooring is flush with the floor
joist. Use an 8” to 12” nail spac-
ing.
(29) Nail along the front side,
again; making sure flooring is
flush with the band board.
(30) Put the next piece in place,
then refer to following step.