
Use and Care Manual

20
(866) 210-9273 - info@yardcraft.com
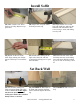
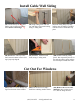
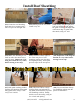
(140) Repeat previous steps for the
back side.
Note: If the marks on the
sheathing do not align properly
with the rafters, you will need to
lift a corner of the building, to
adjust it.
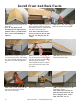
(142) Make a mark flush with the
gable fascia, then cut to length.
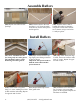
(141) Hold the long fascia piece in
place, starting with the right side,
and making sure it is centered with
the rafter. Do not nail yet!
Note: One of the three fascia
pieces per side are shorter than
the rest. Use this piece for the
center.
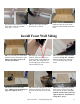
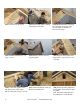
(146) Make a mark, flush with the
fascia on the bottom as shown,
then refer to next step.
(147) Cut along the mark. (148) Completed! Repeat on the
other three corners.
Note: This is the best time to
paint the shed; before the win-
dows, shingles, doors, corner
trim, and vents are on.
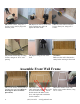
(143) Fasten to rafters, using two
2” trim nails per rafter, and making
sure fascia is flush with the top of
the rafters, and with the gable fas-
cia.
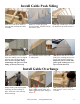
(144) Fasten the center piece, us-
ing the short piece of fascia, mak-
ing sure the splice is tight against
the other piece as shown.
Then hold the last piece in place,
and repeat the same steps as the
first piece.
(145) Repeat previous steps for the
fascia on the back side.
Install Front And Back Fascia