
User Manual


TOOLS for n Version2 Update Guide
7
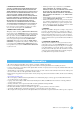
Uninstalling Extensions for Steinberg DAW
Windows XP:
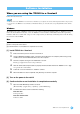
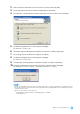
1 From the Start menu, select ([Settings] ) [ControlPanel] [Add or Remove Programs] to display the Add
or Remove Programs panel.
2 Click “Change or Remove Programs” located in the upper left, then select “Yamaha Extensions for
Steinberg DAW” from the list in the right pane.
3 To uninstall the software, click [Remove].
A dialog box appears. Follow the instructions to remove the software.
Windows Vista:
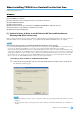
1
From the Start menu, select ([Settings]
) [ControlPanel]
[Programs and Features] to display the “Uninstall
or change a program” window.
2 Select “Extensions for Steinberg DAW” from the list.
3 Click [Uninstall].
If the “User Account Control” window appears, click [Continue]. A dialog box appears. Follow the instructions to
remove the software.
[2] Install TOOLS for n Version2
For details, refer to the TOOLS for n Version2/Cubase AI Installation Guide. The installation procedure is the same as that appli-
cable when installing this software by using the “TOOLS for n Version2” CD-ROM. When you start installation, make sure to
double-click “setup.exe” in the compressed file (you have downloaded) instead of the CD-ROM.
NOTE
• On Windows XP, executing this procedure will take you up to step 15 (page 7) in the TOOLS for n Version2/Cubase AI Installation Guide.
After completing the procedure, continue the update steps following step [3] “Connect the n8/n12 to the computer, then turn on the power to the
device” in this Update Guide.
[3] Connect the n8/n12 to the computer, then turn on the power to the device
NOTE
• If you connect the n8/n12 to the computer with Windows XP for the first time, the “Found New Hardware Wizard” window appears. Select the
radio button next to “Install the software automatically [Recommended],” then click [Next]. When the message of the installation completion is
displayed, click [Finish].
• A dialog box may appear asking you whether you wish to connect to Windows Update. In this case, select the radio button to the left of “Not at
this time,” then click [Next].
[4] Update IEEE1394 firmware
For details, refer to the Update Guide included in the IEEE1394 Firmware Updater.
[5] Update n8/n12 firmware
For details, refer to the Update Guide included in the n8/n12 Firmware Updater.