
Optional Boards for DSP UNIT Installation Manual

3
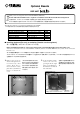
フラットケーブル
ribbon cables
1. Remove the unit front cover as
described in the previous pro-
cedure. Remove two ribbon
cables from the board.
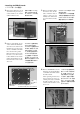
<Installing the PDB1D board>
<PDB1Dボードの装着>
3. Remove six ribbon cables
from the board. At this
time, mark the ribbon
cables so that you can
identify each of them and
re-connect them correctly
later.
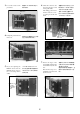
側面カバー
side cover
ラックマウント金具12ヶ
12 screws for the rack mount hardwa
re
上2個
Two bottom
screws
下2個
Two top
screws
2. Remove eight fixing screws
on the rack mount hardware,
and remove the rack mount
hardware. Do not remove any
screws or hardware other than
those shown in the picture.
Remove twelve screws on the
left side cover, then remove
it. Note that the screws for the
rack mount hardware are dif-
ferent from the screws on the
side cover.
前述の手順でユニット正
面カバーを取りはずしま
す。フラットケーブル2本を
取りは ずしま す 。
ラックマウント金 具 の 固 定
ネジ 8ヶ所 をとりは ずし 、
ラックマウント金 具を 取りは
ずします 。写真に示した以
外ははずさないでくださ
い。そのあと左側面カバー
の12ヶのネジを取りはず
し、左側面カバーを取りは
ずします 。ラッ クマ ウント金
具のネジと側 面 カバ ーの ネ
ジは種類が異なりますの
でご注意ください。
フラットケーブル6本をボードから
取りは ずしま す 。
この際フラットケーブルを再装着
するときに誤接続を防ぐため各フ
ラットケーブルにマーキング等 で
識 別 できるようにしてお きます。
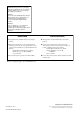
4. Remove the PDB1D board. At
this time, care should be taken
so that the board will not catch
the ribbon cable.
After replacing it with a new
board, follow the steps de-
scribed previously to re-install
the ribbon cables, side cover,
rack mount hardware, and
front cover.
PDBボードを引き抜きます。
新しいPDBボード交換しま
す。その際、フラットケーブ
ルをはさまないよう注意し
てください 。前述の手順の
逆でフラットケーブ ル 、側面
カバー、ラック マ ウント金 具
正面カバーを順に再び取り
付けてください 。
フラット
ケーブル
ribbon
cable