
User manual

6
Quick Start
Activate the Yakumo Mini Receiver DVB-T
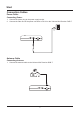
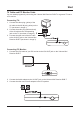
1. Followtheinstructions(indicatedinthe“ConnectionCable”section)toconnectthepower
supply and other required peripheral devices.
2. Make sure that the batteries have been properly installed in the remote control.
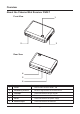
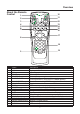
3. After the TV or the monitor is on, press POWER on the remote control or POWER on the top
of the Yakumo Mini Receiver DVB-T to turn on the TV receiver.
Initial Setup
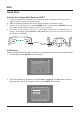
After the Yakumo Mini Receiver DVB-T is turned on, it will automatically lead you to the Installation Wizard.
1. Select YES and press ENTER to start installation.
2. Press the Up/Down arrow buttons to select Country, Language, and Time Zone. Press the
Right/Left arrow buttons to change the setting. Select NEXTwhenfinished
Start
First Time Installation
Do you want to start first time
Installation Wizard ?
YES
NO
First Time Installation (1)
BACK
Country
England
English
GMT + 00:00
Language
Time Zone
NEXT
POWER
VGA OUT /
AV OUT
4. The default of video output is for the TV. If the Digital TV Receiver is connected to a PC
monitor / LCD display, press VGA OUT / AV OUT button on the remote control to switch to
the monitor / LCD display.