
User's Manual


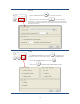

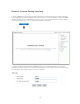


Table Of Contents
- WHLIP229_FCCID_UserManual.pdf
- FCC Warning.pdf
- _
- FCC Warning
- _
- This device complies with Part 15 of the FCC Rules. Operation is subject to the following two conditions:
- (1) this device may not cause harmful interference, and (2) this device must accept any interference received, including interference that may cause undesired operation.
- _
- NOTE 1: Any changes or modifications to this unit not expressly approved by the party responsible for compliance could void the user's authority to operate the equipment.
- _
- This device must be installed to provide a separation distance of at least 20 cm from all persons
- and must not be collocated or operating in conjunction with any other antenna or transmitter.
- _
- _
- _

11
6. Double-click the Camera Setup icon on the Desktop to launch the program. The Camera Setup utility
should automatically find your camera if is correctly connected (See image below).
[Refresh] Click Refresh to search for cameras on the local network.
[Setup] Select the required camera and click Setup to configure the network settings for the camera.
[Open] Select the required camera and click Open to access the camera via a web browser.
[Exit] Click Exit to exit the Camera Setup window.
Note: Select and double click one of the cameras from the Device list, to open the camera view via the web
browser.
Assigning an IP address to the Camera with Camera Setup
1. Launch Camera Setup program to detect cameras on the local network.
2. Click on “Setup” button and the following setup interface will pop up.