
Manual


28
Operations
03
Creating a Sequence
Follow the procedure to create a sequence:
1. Connect the Robotic Arm to your computer. Connect one end of a USB cable to the computer
(USB Type A), and the other end to the Robotic Arm (USB Type Mini-B).
2. Power up the Robotic Arm; see “Testing the Robotic Arm” in the Assembly Manual.
3. Locate and open the XYZrobot Editor application.
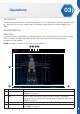
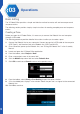
4. From the toolbar select Tool > Sequence List.
5. Click Add to create a new sequence entry. The New sequence settings window displays.
6. In the open field, enter the name of the sequence entry and click Ok to continue.
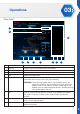
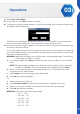
7. Under the Pose List column, click Add to add an available pose to the selected sequence list.
The newly added pose entry is added to the bottom of the existing sequence list with the default
Delay timer (500 milliseconds).
8. To modify the delay timer for a pose, click the Pose drop-down menu and click on the up and
down arrows on the Delay frame to adjust the time (milliseconds). Alternatively, you can enter a
variable by typing it in the Delay field.
9. Once you’ve edited the pose you will need to add it back in to the list. Click Add to add the pose
into the selected sequence.
You can also organize the pose order of appearance to customize the order in which the pose list
is executed.
10. To re-order a pose, under Pose List, select a pose entry and click Move Up or Move Down to
position the entry into your desired order.
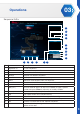
11. Once the sequence is designed, you can initiate a test to view the pose selections performed by
the Robotic Arm.
12. Select the a sequence from the Sequence List.
13. Click Run to run the selected sequence. Alternatively, you can click Loop to continuously run the
selection. Click Halt to initiate a stop command.