
User Manual


13
OPERATING PROCEDURES
Caution: Check carefully for any damage during transportation and ensure that the
working voltage matches your power supply before plugging in the station.
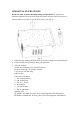
1. Ensure that the base unit’s power switch is in the ‘OFF” position.
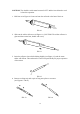
2. Plug in “Solder and Desolder” wands, connect “Vacuum tube” to “VAC”. Put the
hot air gun to the (holder)
3. Connect AC power cord to mains “In-Let”.
4. Turn switch “ POWER SWITCH” to “ON” position and the switch led will be
light.
5. All of the functions ( Soldering ,Desoldering,Hot air gun )will work at the same
time after turning the power switch , and then the corresponding temperature LED
or wind LED display will be ON and show the value.
6. Users can turn off the the Soldering function or Desoldering function by pressing
the key”SET+UP” ,then the corresponding LED display will show “_ _ _”.
NOTE: It means that the corresponding heater power is cut off.At this time ,the
users can only use the hot air function.
Pressing on the “▲”on can reuse the corresponding function.
A: Soldering function / Desoldering function option
1) Press the “▲” key up until the temperature to 250℃ (482℉) (If set to degrees
Centigrade, the temperature display window of the upper right corner shows ℃, if
set to degrees Fahrenheit, the temperature display window of the upper right corner
shows ℉).
2) Then tin the surface of both soldering and desoldering tips by applying a new
covering of solder to protect it.
3) You can set the desired temperature setting by pushing the “up” or “down” key.
When the temperature reaches to the desired temperature that the heating indicator
light will be flashed on and off to maintain the set temperature. The unit now is
ready for use.
CUATION: Do not touch any of the irons at any time while the unit is on or while it’s
cooling as they will still be hot.
IMPORTANT
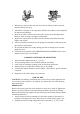
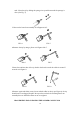
DESOLDERING
1. Only activate the vacuum after the solder has completely melted. Melting is
accomplished by moving the hot tip around the lead leaving visible melted
solder on the component side of the P. C. B.
See Fig. 1 & 2.