
User guide
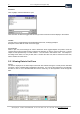
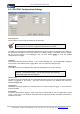
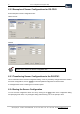
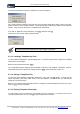
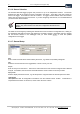
Table Of Contents
- Version: V2.7.1.2
- Contents
- 1 INSTALLATION and OVERVIEW
- 2DEVICE CONNECTION
- 3ENGINEERING RESOURCES
- 4MANAGING PROFILES
- 5MANAGING LOGGED DATA
- 6CONFIGURING DATALOGGERS
- 6.1 Introduction
- 6.2 DS-CPU3 Configuration
- 6.3 DS-4483 Configuration
- 6.3.1 DS-4483 Sensor Configuration Settings
- 6.3.1.1 Retrieving the Datalogger Configuration
- 6.3.1.2 Transferring Configuration Settings to the DS-4483
- 6.3.1.3 Loading a Template into iLink
- 6.3.1.4 Saving a Template to file
- 6.3.1.5 Printing Template Information
- 6.3.1.6 Sensor Selection
- 6.3.1.7 General Setup
- 6.3.1.8 I/O Setup
- 6.3.1.9 Scaling Setup
- 6.3.1.10 Timing/Misc Setup
- 6.3.1.11 Alarms Setup
- 6.3.1.12 Output Setup
- 6.3.1.13 Comment Setup
- 6.3.2 Telemetry Communications Control Configuration
- 6.3.4 New Sensor Wizard
- 6.3.1 DS-4483 Sensor Configuration Settings
- 7LOADING PROGRAMS
- 8DEVICE CALIBRATION
- APPENDIX A
- APPENDIX B
- APPENDIX C
- APPENDIX D
36 iLink - Configuration and Support Utility
iQuest (NZ) Ltd - PO Box 15169 HAMILTON Tel: +64 7 957 8160 - Fax: +64 7 957 8162 - Email: iquest@iquest.co.nz
6.2.2 Examples of Sensor Configurations for DS-CPU3
Some examples of sensor configurations are:
Water Level #1
Rainfall
In the above examples, only Water Level #1 and Rainfall are active, indicated by
the tick next to each in the Sensor Configuration box.
6.2.3 Transferring Sensor Configurations to the DS-CPU3
This is achieved from the DS-CU3 configuration dialog. Once any necessary changes have been made to
the sensor configurations, click on [Update] to send the updated configuration to the DS-CPU3.
A message will be shown confirming the successful update.
6.2.4 Saving the Sensor Configuration
You can save the configuration shown in iLink by clicking on the [Save] button in the configuration dialog
and specifying a file name, or by closing the dialog and answering ‘Yes’ to the prompt to save.