
User Manual


Page 20 on 20
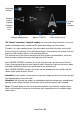
Then detach the front of the wing: hold the wing structure firmly and pull it out so that it
comes out the slot. It is not necessary to change both wings, when just one is broken.
Choose the appropriate spare wing (left or right) corresponding to the one to be replaced.
Proceed reverse way: Start by inserting the wing structure in the slot, you should feel a
“click” which means that the wing is correctly inserted.
Clip the back of the wing to the round knob, underneath the tail.
VIII – REPLACING OTHER PARTS
If ever the foam body, the tail or other parts were destroyed, please feel free to contact
our customer's service at: sav@mybionicbird.com to get replacement parts and
instructions on how to replace them.
IMPORTANT NOTES ABOUT THE USE OF BIONIC BIRD:
- It is strongly recommended to charge the bird at least at 50% of the battery capacity
before to store it after use. Or the battery life will be shortened a lot.
- At cold temperature, the batteries are losing most of their power. It may happen that
your BIONIC BIRD performance decrease. The egg may also take more time to charge it.
It is advised to charge the bird indoor (warm temperature), then to go out for flying.
Below 0°C (32 F), the wings may also unstick. It is advisable not to play in such low
temperature.
- The motor and clockworks inside BIONIC BIRD are very efficient, with very tight
tolerance.
They need a training period during which they will get free of frictions.
The maximum power and flying time will be reached after about ten flights.
Mechanism
Wing structure