
installation instructions XP5031 Manual
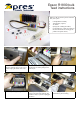

Firmly push down the cartridges now
until they click into place. Plug the mains
lead back in and turn the printer on.
The machine will now go into an ink
charge routine. Do not worry about any
small amounts of air you see in the tubes.
This will work it’s way out of the system
during the next few moments.
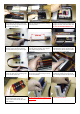
Run the auto nozzle check routine from
the utility section of your printer driver.
It may look something like this. You may
have to run this twice.
Do not run the auto nozzle routine more than twice. If the nozzle check is not perfect let the machine sit for
an hour or so to settle down then run a normal nozzle check and possibly the manual head clean.
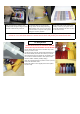
Re-filling Bottles
Do Not Allow The Ink To Fall Below The Red
Line Or The Top Of The Sticker On The Bottles
Lay the bottles down and remove the filter cap of the
colour you wish to re-fill.
Use the syringe (with the small nozzle attachment you
find in the handle) to fill this colour. Note you cannot
fill it further than the hole allows (do not stand it up so
you can fill the smaller chamber—this system works
with the smaller chamber partially empty).
Clean the syringe between any further colours you may
wish to fill with warm water.
Return the bottles to the upright position and replace
any filter caps.
Full