Subli-Print Epson 1290 Instruction Manual Tel: 01332 855 085 Technical Support: 01332 858 333 Fax: 01332 855 080
CONTENTS Section 1 Page 1 Section 2 Page 2-3 Section 3 Page 3 Section 4 Page 4-6 Section 5 Page 7-8 Page 8 Section 6 Page 8 Section 7 Page 8 Section 8 Page 9 Page 10 Page 10-11 Section 9 Page 11 Section 10 Page 12 Driver Installation & Setup Installing & setting up the Epson 1290 Printer CorelDRAW setup Installing & setting up the Xpres Subli-Print colour profile Printing Printing with the Xpres Subli-Print colour profile Bulk feed system Installing the Subli-Print bulk feed system Templates W
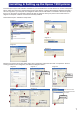
Installing & Setting up the Epson 1290 printer Insert the Epson Stylus 1290 software CD-ROM into your CD-ROM drive. The CD will auto run. Select 'Install printer Driver / Utility' from the menu, and click the arrow as in the diagram 1 below. When Diagram 2 appears click OK. It will now copy files to your computer as in diagram 3. Make sure the USB cable is connected to the PC and printer, then turn on the printer as instructed in diagram 4.
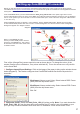
Setting up CorelDRAW 10 onwards Before you start this section you will need to download the Xpres Subli-Print colour profile from the Xpres website. The address is www.xpres.co.uk/downloads.php You can also find the profile on the Subli-Print CD supplied with the bulk feed system. This disk can also be sent out upon request. Close CorelDRAW. When you have downloaded the 'Subli_Print_1290.V1.icm' colour profile, right click on it and choose 'Install Profile' from the top of the menu.
3. Monitor: Select the ICC profile for your monitor (If you also have Adobe Photoshop on your system you can select the profile you created in Adobe Gamma). You may also check out the website of your monitor manufacturer for ICC profiles for your particular monitor. If you do not have an ICC colour profile use the 'Generic Profile' instead. 4. Internal RGB Space: Select Internal RGB Fraser (1998) 5. Save your settings: Click the + button and name your settings Subli-Print then Click OK.
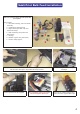
Subli-Print Bulk Feed Installation Make sure you have all the relevant parts with your system. These include: 1. 1 x Pre-filled cartridge, tube and bottle assembly. 2. 2 x replacement cartridge lids. 3. 1 x bag containing 6 filter caps and small tube clamp. 4. 1 x Disk containing ICC profile and instructions. 5. 1 x Syringe 6. 5 x bottles of spare ink (40ml each) 7. 1 x Centre clamp support 4 6 1 7 3 Press yellow button and remove power lead as cartridge moves to the left.
Push the colour cartridge home make sure the catch is closed Now push home the Black cartridge and close the lid. Make sure the tubes are exiting between the ‘Colour’ lid and the ‘Black’ lid Push the printhead all the way to the left of the printer. Hold the centre clamp central to the black vertical line and make sure all the slack tube is taken up (without pulling the printhead from the left).
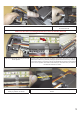
You can now move the cartridge manually to its furthest left and right position to make sure the tubes are free from fouling and the printhead can reach these positions without the tubes becoming tight. When you are satisfied that the tube assembly is correctly installed you can fit the final part of the centre tube clamp. This is how the final part should look. You can now replace the power lead and the printer will move the printhead into the correct position and start the initial ink charge.
Working with templates In this section you will learn how to open a sublimation template, import an image and use the power clip tool to fit the image to the template. For this exercise we will use the 9cm² square coaster. If you have had an installation by an Xpres engineer, you will find the templates in a folder on your desktop called 'Xpres'. Otherwise you can either download these from the Technical Support section of our website www.xpres.co.
Working with templates continued Diagram 1 If your image does not fit the power clip correctly first time, right click on the image and choose 'Edit Contents' from the drop down menu (diagram 1). You can also click on Effects > Power Clip > Edit Contents. Drag the image (you will see the image and the template on the screen) until you have it in the right place. You can even re-size the object in the 'Edit' state.
Introducing CorelDRAW & its tools CorelDRAW is an extremely powerful program of which you will probably only need to use half of the tools and features of the program. In this section we will introduce you to the tools in CorelDRAW and what they do and also take you through the most common tasks you will need to complete in CorelDRAW. Below is an image of the toolbox in CorelDRAW with explanations of the tools based on Corel 11.
CorelDRAW's most common tools The Pick Tool This is the main tool that you will use in CorelDRAW, it is used for manipulating anything onscreen in the main window and also for selecting and using any of the other tools, holding the left mouse button and dragging a box will select anything within the area that you drag over, clicking an object onscreen with a single left mouse button click will select individual objects.
Common CorelDRAW tasks continued Sizing images There are many ways to resize an object in CorelDRAW. You can click and drag the selection handles around the object by using the pick tool. Property bar Object position on page Object size Scale factor Non-proportional scaling/sizing ratio Selection handles You change the dimensions of an object proportionally by preserving its aspect ratio. You can size an object’s dimensions by specifying values or changing the object directly.
General troubleshooting and tips Useful CorelDRAW tips To ensure CorelDRAW performs at it's best, click on Tools > Options, click on 'snap to objects' and un-tick the 'snap to objects on (ALT+Z)'. Now click on the + next to 'Text' and click on 'Quick correct'. Un-tick all five boxes. Depending on your system memory you can increase the memory usage available to CorelDRAW (default 25%). If CorelDRAW is sluggish and running out of memory try increasing this (20% increments recommended).