Xpres Cut® Plus INSTRUCTION MANUAL
Xpres Cut® Plus INSTRUCTION MANUAL contents Installation and Set up Installing and setting up the Roland GX-24 cutter p3 Roland GX-24 functions Loading garment film p3 Installing and changing Xpres blades p4 Blade usage p4 Blade force p4 Using CorelDRAW An introduction to CorelDRAW and its tools p5 CorelDRAW’s most common tools p5 Common tasks using CorelDRAW p6 Xpres Cut® Plus Roland GX-24 Front Panel Overview p7 Setting the Media sizes on the Roland GX-24 p7 Producing text for cutting
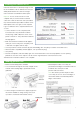
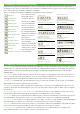
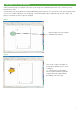
Installing the Roland GX-24 Insert the Roland GX-24 software package CD into the CD-ROM drive. The CD Will Auto Run and you will be presented with the screen on the right. Click Install next to the Windows driver option. Important: Do not connect the GX-24 to the computer until you are instructed to make the connection. Failure to follow the correct procedure may make installation impossible. Installation of the driver requires full access rights for the computer.
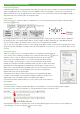
Loading garment film continued 5. Align the left edge of the material so that it lies parallel to the guide lines. Note: • Do not use excessive force when moving the loading lever. Doing so may damage it. • If the condition of the material is as described below, then stretch or flatten it before use. * The material is curled upward. * The leading edge of the material is bent or creased. 6. Raise the loading lever. The material is now secured in place. 7. Turn on cutter, the display will read.
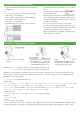
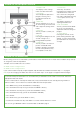
Introducing CorelDRAW and its tools CorelDRAW is an extremely powerful program of which you will probably only need to use half of the tools and features of the program. In this section we will introduce you to the tools in CorelDRAW and what they do and also take you through the most common tasks you will need to complete in CorelDRAW. Below is an image of the toolbox in CorelDRAW with explanations of the tools based.
Common CorelDRAW tasks Grouping & Ungrouping CorelDRAW allows objects to be grouped with other objects this means that when one object is moved or resized and other objects grouped with it will also have the same action applied to them. To group objects, use the pick tool to select the objects and either go to your arrange menu, then select “Group” or click on the button in the menu bar labelled “Group”, to Ungroup do the same action but select the “Ungroup” option.
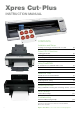
Roland GX-24 front panel overview 1. Display Panel This displays various settings menus and other information 2. Pause Key This interrupts the operation in progress. Pressing it for a second time resumes the operation. 3. Menu Key This key will allow you access to all of the settings for the machine and to adjust the settings within menus. 4. Enter Key This key is used to confirm your selections. 5. Test Key Pressing and holding this for one second or longer cuts a pre-registered test pattern. 6.
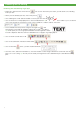
Producing text for cutting Producing text and selecting a type style 1. Select File > New and click on the text tool Enter your text. Click once on the main layout screen, you will see the cursor flashing. 2. When you have entered your text, click on the pick tool. 3. Click and drag the corner selection handles to re-size your text. TEXT 4. Click on the font list on the property bar to choose the desired font.
The Xpres Cut® Plus process Over the next few pages you will learn how to place your images into CorelDRAW, print them, then cut them out on the Roland GX-24 cutter. You will need to use the templates that were provided during your installation or on your technical CD, they should be saved to your PC in a folder called Xpres on your desktop.
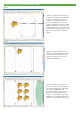
The Xpres Cut® Plus process continued Step 3 Produce a hairline cut line around your image using the Bezier Tool and Shape Tool. For more information on how to produce a cut line refer to page 13. It is recommended that your cut line colour is unique to the rest of the image. Magenta is a popular colour as this can be identified easily. To change the colour of the cut line, highlight the cut line and right click on the colour on the colour palette.
The Xpres Cut® Plus process continued Step 6 The cut lines now need to be grouped together. Click on Window > Dockers > Object Manager. You will see the cut lines appear under the ‘Page 1’ section. Click on the top cut line, hold the Shift key down and click on the bottom cut line. You will now see them all highlighted in blue on the object manager. While they are highlighted click on the Group button or go to Arrange and choose Group. It would now be a good time to save the design.
The Xpres Cut® Plus process continued Step 9 Select the Roland GX-24 from the drop down list (1). Now click on Selection from the ‘Print Range’ area (2). Now click the Print Preview button (3). Step 10 - Loading the Roland GX-24 Refer to page 7 for button positions, and media sizes (these will need to be set before you send the job to the cutter).
Using CorelDRAW’s drawing tools and drawing cut lines To produce cut lines around your designs within CorelDRAW you will need to use two different tools, the “Bezier tool” and the “Shape tool”. These are located in your standard tool bar usually located on the left hand side in CorelDRAW. The bezier tool is in the fourth (or fifth on Corel X3 and X4) tool down and is the second tool in the flyout menu as shown here.
Creating a cutline for a vector image 1 In CorelDraw go to file and open and select the correct template for A4 or A3 Inkjet Dark paper. (This should open the 3 cropmarks on the page). 2 Next go to file and import and bring in the logo that you want to use. 3 Re-size your logo so it is the size you are looking to print. 4 Now we need to create the cutlines, select your image and go to arrange, shaping and boundary (Corel X5). For earlier versions of CorelDraw it will be effects and create boundary.
Driver settings Xpres currently recommend the Epson D120/B1100 printers using pigment ink for the Xpres Cut Plus Process. For the correct settings for these printers please see below. For other pigment printers, as a general guide we recommend to set the print driver to ‘Plain Papers’ and ‘Photo’, however Inkjet Printers do differ in terms of speed and quality, always test for suitability.
General troubleshooting and tips The cutter is not doing anything when I send a job to it but the fan comes on Check that you have set the outline to the thinnest possible line, for example 0.076mm or Hairline.