
User manual
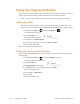

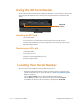
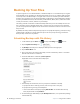


Table Of Contents
- L10 Platform for the XSLATE™ and XPAD™ Tablets
- Table of Contents
- Getting Started
- Using Your L10 Tablet
- Using the Battery
- Managing Wireless Connections
- Connecting to a Wi-Fi Network
- Connecting to Bluetooth Devices
- Connecting to a Mobile Broadband Network
- Using Global Navigation Satellite System (GNSS)
- Know Your Tablet
- Using Sleep Mode
- Using the XPAD Function Buttons
- Using the Cameras
- Using the Built-in Microphones
- Using Integrated Optional Features
- Using the Fingerprint Reader
- Using the SD Card Reader
- Locating Your Serial Number
- Backing Up Your Files
- Restoring Your System
- Caring for the L10 Tablet
- Troubleshooting and FAQs
- Index

38 Backing Up Your Files Chapter 2 Using Your L10 Tablet
Backing Up Your Files
To protect against loss or accidental deletion, schedule backups to occur automatically on a regular
basis. Windows 10 has a backup tool called File History that you can use to configure what you want
to back up and to schedule backups on a regular basis. You can use File History to make automatic
backup copies of your files onto an external hard disk or network drive. It works with folders and files
stored in your Windows libraries, which include your Documents, Music, Photos, and Videos folders
as well your Favorites, Contacts, and files on your desktop.
File History performs continuous incremental backups that allow you to save multiple versions of a
file or document. If you accidentally delete a file or need to revert to a previous version of that file,
you can easily step back through the various saved versions of that file in order to locate the version
that you need.
By default, File History makes hourly back-ups, but you can specify the frequency yourself, choosing
anything from 10 minutes to a single daily back-up. You can also specify how long you want File
History to keep old versions of your files.
Scheduling Backups with File History
1. On the taskbar, tap the Start icon, , and tap the Settings icon, , above it.
2. Tap the Update & Security icon.
3. Tap Backup in the left pane to display the Backup menu in the right pane.
4. Tap the Add a Drive icon.
5. Tap to pick a device for storing your backup, such as a USB memory device or a network
drive. Be sure the drive is connected.
6. Under the Add a Drive command, tap More Options.
The Backup options Overview menu is displayed.
7. In the Backup Overview menu, choose your options and folders to backup.
a. Specify how often to back up your files, such as every hour or every day.
b. Specify how long to keep your backup files.
c. Choose the folders to back up by tapping Add a Folder. To exclude folders already
listed, tap the folders and tap Remove.
8. To start backing up immediately, tap the Back up now button, or let your backup settings
run automatically.