
User manual
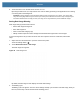
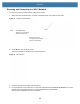
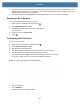
Table Of Contents
- Copyright
- Terms of Use
- Revision History
- Contents
- About the Tablet
- Getting Started
- Using the Device
- Introduction
- Google Mobile Services
- Home Screen
- Managing Notifications
- Quick Settings
- Application Shortcuts and Widgets
- Using the Touchscreen
- Using the Cameras
- Using the Built-in Microphones
- Using the SD Card Reader
- Using the XPAD Programmable Function Buttons
- Applications
- Unlocking the Screen
- Suspend Mode
- Restarting the L10
- Transferring Files with USB
- Applications
- Wireless
- Introduction
- Wireless Wide Area Networks
- Wireless Local Area Networks
- Scanning and Connecting to a Wi-Fi Network
- Removing a Wi-Fi Network
- Configuring a Wi-Fi Network
- Manually Adding a Wi-Fi Network
- Configuring for a Proxy Server
- Configuring the Device to Use a Static IP Address
- Wi-Fi Preferences
- Additional Wi-Fi Settings
- Wi-Fi Direct
- WPS Pin Entry
- WPS Push Button
- Wi-Fi Advanced Features
- Zebra Mobility Extensions
- Bluetooth
- Using the NFC Reader
- Data Capture
- Accessories
- Settings
- Application Deployment
- Introduction
- Security
- Secure Certificates
- Installing a Secure Certificate
- Development Tools
- GMS Restricted
- ADB USB Setup
- Enabling USB Debugging
- Application Installation
- Performing a System Update
- Performing an Enterprise Reset
- Performing a Factory Reset
- Storage
- App Management
- Viewing App Details
- Managing Downloads
- Maintenance and Troubleshooting
- Specifications
- Index

Wireless
88
Figure 75 WLAN 802.11 EAP Network Security Dialog Box
8. If the network security is WEP or WPA/WPS2 PSK, enter the required password and then touch Connect.
9. If the network security is 802.1x EAP, follow these steps:
• Touch the EAP method drop-down list and select PEAP, TLS, TTLS, PWD, or LEAP.
• Touch the Phase 2 authentication drop-down list and select an authentication method.
• If required, touch CA certificate and select a Certification Authority (CA) certificate. Note: Certificates are
installed using the Security settings.
• If required, touch User certificate and select a user certificate.
Note: User certificates are installed using the location & security settings.
• If required, in the Identity text box, enter the username credentials.
• If you like, in the Anonymous identity text box, enter an anonymous identity username.
• If required, in the Password text box, enter the password for the given identity.
NOTE: By default, the network Proxy is set to None and the IP setting is set to DHCP. See Configuring for a Proxy
Server on page 89
for setting connection to a proxy server. See Configuring the Device to Use a Static IP Address
on page 90 for setting the device to use a static IP address.
10.
Touch Connect.
11. Touch .
Manually Adding a Wi-Fi Network
Manually add a Wi-Fi network if the network does not broadcast its name (SSID) or to add a Wi-Fi network when
out of range.
1. Swipe down from the status bar and then touch the Settings icon .
2. Touch Network & Internet > Wi-Fi.
3. Slide the Wi-Fi switch to the On position.