
User manual
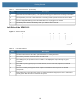
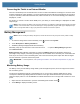
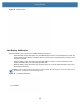
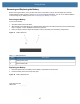
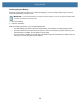
Table Of Contents
- Copyright
- Terms of Use
- Revision History
- Contents
- About the Tablet
- Getting Started
- Using the Device
- Introduction
- Google Mobile Services
- Home Screen
- Managing Notifications
- Quick Settings
- Application Shortcuts and Widgets
- Using the Touchscreen
- Using the Cameras
- Using the Built-in Microphones
- Using the SD Card Reader
- Using the XPAD Programmable Function Buttons
- Applications
- Unlocking the Screen
- Suspend Mode
- Restarting the L10
- Transferring Files with USB
- Applications
- Wireless
- Introduction
- Wireless Wide Area Networks
- Wireless Local Area Networks
- Scanning and Connecting to a Wi-Fi Network
- Removing a Wi-Fi Network
- Configuring a Wi-Fi Network
- Manually Adding a Wi-Fi Network
- Configuring for a Proxy Server
- Configuring the Device to Use a Static IP Address
- Wi-Fi Preferences
- Additional Wi-Fi Settings
- Wi-Fi Direct
- WPS Pin Entry
- WPS Push Button
- Wi-Fi Advanced Features
- Zebra Mobility Extensions
- Bluetooth
- Using the NFC Reader
- Data Capture
- Accessories
- Settings
- Application Deployment
- Introduction
- Security
- Secure Certificates
- Installing a Secure Certificate
- Development Tools
- GMS Restricted
- ADB USB Setup
- Enabling USB Debugging
- Application Installation
- Performing a System Update
- Performing an Enterprise Reset
- Performing a Factory Reset
- Storage
- App Management
- Viewing App Details
- Managing Downloads
- Maintenance and Troubleshooting
- Specifications
- Index

Getting Started
27
Removing and Replacing the Battery
Before removing the battery, save your files and power off the tablet, or plug in the AC adapter and continue
working while the battery charges. However, if you are hot swapping the battery, you can do so while the tablet is
on and running only on battery power. See Hot Swapping the Battery on page 28.
Removing the Battery
To remove the battery:
1. Save files and shut down the tablet.
2. With the back of the tablet facing you, slide the battery latch to the left until the latch stays open and the battery
pops out slightly. A red is displayed instead of the green dot.
3. Insert your finger under the finger tab and pull to remove the battery from the battery compartment.
Figure 21 Battery Removal
Replacing the Battery
1. Place the tabbed end of the battery into the battery compartment as shown here.
2. Press the battery down until it snaps into place.
Figure 22 Battery Replacement
Table 11 Battery Removal
Item Description
1 Sliding battery latch
2 Pull-out battery tab
21
Insert this end of the
battery first.