
User manual
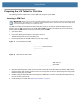
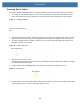
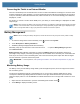
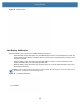
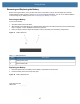
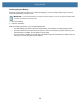
Table Of Contents
- Copyright
- Terms of Use
- Revision History
- Contents
- About the Tablet
- Getting Started
- Using the Device
- Introduction
- Google Mobile Services
- Home Screen
- Managing Notifications
- Quick Settings
- Application Shortcuts and Widgets
- Using the Touchscreen
- Using the Cameras
- Using the Built-in Microphones
- Using the SD Card Reader
- Using the XPAD Programmable Function Buttons
- Applications
- Unlocking the Screen
- Suspend Mode
- Restarting the L10
- Transferring Files with USB
- Applications
- Wireless
- Introduction
- Wireless Wide Area Networks
- Wireless Local Area Networks
- Scanning and Connecting to a Wi-Fi Network
- Removing a Wi-Fi Network
- Configuring a Wi-Fi Network
- Manually Adding a Wi-Fi Network
- Configuring for a Proxy Server
- Configuring the Device to Use a Static IP Address
- Wi-Fi Preferences
- Additional Wi-Fi Settings
- Wi-Fi Direct
- WPS Pin Entry
- WPS Push Button
- Wi-Fi Advanced Features
- Zebra Mobility Extensions
- Bluetooth
- Using the NFC Reader
- Data Capture
- Accessories
- Settings
- Application Deployment
- Introduction
- Security
- Secure Certificates
- Installing a Secure Certificate
- Development Tools
- GMS Restricted
- ADB USB Setup
- Enabling USB Debugging
- Application Installation
- Performing a System Update
- Performing an Enterprise Reset
- Performing a Factory Reset
- Storage
- App Management
- Viewing App Details
- Managing Downloads
- Maintenance and Troubleshooting
- Specifications
- Index

Getting Started
23
Pens for the L10 Tablets
All L10 tablets support touch input with your finger. In addition, a pen or stylus is provided with your tablet, and is
compatible with the screen configuration that you order. Many people use a pen for more convenience or precision.
The pen is particularly effective for precise data entry and navigation.
The XSLATE and XBOOK tablets come with short pens that fit into the pen holder on these devices. The XPAD
tablet includes a longer, thicker pen. If you want a longer pen for the XSLATE or XBOOK tablet, a handle
accessory can be ordered with the longer pen.
Capacitive Pens
Capacitive pens work with the tablet’s touchscreen and are sometimes called
passive
pens. The short capacitive
pen does not need a battery. The long capacitive pen uses a AAAA battery. These two pens do not require a pen
digitizer in the tablet. They work with the tablet’s touchscreen directly.
Figure 16 Capacitive Pens
Active Digitizer Pens
If the tablet is ordered with an active Wacom digitizer built in to the screen, you will receive one of the two pens
pictured below. These Wacom-compatible pens allow for a large range of pressure sensitivity, tilt detection, and
hover capability. Hover lets you see where the pen is pointing before the tip touches the display. These pens are
frequently called active pens. These active pens use all three modes of the touch screen:
• Finger and Wet
• Finger and Glove
• Finger and Passive Stylus (default)
Figure 17 Digitizer Pens
Optional Setup Tasks
Attaching the Pen Tether
The pen comes with a tether so that you can attach it to your tablet to avoid misplacing it.
1. Slip one end of the tether through the hole at the end of the pen, and pull the pen through the loop until it is
tight.
2. Slip the other end of the tether through the attach point on the tablet, then pull the pen through the loop until it
is tight.
Long Capacitive ePen w/batteryShort Capacitive Pen
Long Active Digitizer PenShort Active Digitizer Pen