
User manual
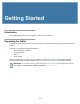
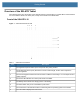
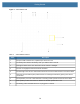
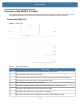
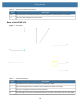
Table Of Contents
- Copyright
- Terms of Use
- Revision History
- Contents
- About the Tablet
- Getting Started
- Using the Device
- Introduction
- Google Mobile Services
- Home Screen
- Managing Notifications
- Quick Settings
- Application Shortcuts and Widgets
- Using the Touchscreen
- Using the Cameras
- Using the Built-in Microphones
- Using the SD Card Reader
- Using the XPAD Programmable Function Buttons
- Applications
- Unlocking the Screen
- Suspend Mode
- Restarting the L10
- Transferring Files with USB
- Applications
- Wireless
- Introduction
- Wireless Wide Area Networks
- Wireless Local Area Networks
- Scanning and Connecting to a Wi-Fi Network
- Removing a Wi-Fi Network
- Configuring a Wi-Fi Network
- Manually Adding a Wi-Fi Network
- Configuring for a Proxy Server
- Configuring the Device to Use a Static IP Address
- Wi-Fi Preferences
- Additional Wi-Fi Settings
- Wi-Fi Direct
- WPS Pin Entry
- WPS Push Button
- Wi-Fi Advanced Features
- Zebra Mobility Extensions
- Bluetooth
- Using the NFC Reader
- Data Capture
- Accessories
- Settings
- Application Deployment
- Introduction
- Security
- Secure Certificates
- Installing a Secure Certificate
- Development Tools
- GMS Restricted
- ADB USB Setup
- Enabling USB Debugging
- Application Installation
- Performing a System Update
- Performing an Enterprise Reset
- Performing a Factory Reset
- Storage
- App Management
- Viewing App Details
- Managing Downloads
- Maintenance and Troubleshooting
- Specifications
- Index

Getting Started
15
Figure 3 Right Side of the XSLATE L10
Figure 4 Left Side of the XSLATE L10
Table 3 Right Side Features
Item Description
1 Power input connection for the external power adapter
2 Ethernet jack RJ45 port for LAN connectivity
3 Volume control button
4 The round button is a toggle between screen-rotation lock and auto-rotation of the screen.
5 The oval Power button turns on the tablet. When the tablet is on, press to enter and exit sleep mode.
Table 4 Left Side Features
Item Description
1 The memory card slot reads and writes microSD cards.
2 The USB type-C port provides access to USB 3.1 and DisplayPort output through a type-C
connector.
3 Two USB 2.0 type-A ports let you connect devices such as a mouse, keyboard, or external storage.
4 The 3.5 mm audio jack supports stereo output for headset and mono input for an external
microphone.
5 This locking door covers the ports on the L10. When the tablet is shipped, the door is locked and the
latch shows green. Slide the lock to reveal red and open the door to access the ports. To secure the
door for travel or storage, close it firmly and slide the lock until the green appears.
2 3 4 51
3 4
5
1 2