L10 Android ™ Quick Start Guide MN-003429-03EN Rev.
L10 Android ™ Quick Start Guide Copyright ZEBRA and the stylized Zebra head are trademarks of Zebra Technologies Corporation, registered in many jurisdictions worldwide. Google, Android, Google Play and other marks are trademarks of Google LLC. All other trademarks are the property of their respective owners. ©2020 Zebra Technologies Corporation and/or its affiliates. All rights reserved. COPYRIGHTS & TRADEMARKS: For complete copyright and trademark information, go to zebra.com/copyright.
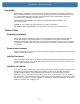
L10 Android ™ Quick Start Guide XSLATE Features Microphone Ambient Light Sensor Front Camera Microphone Power LED Battery LED Reset Switch Home Button Front View Pen Holder and Battery Latch Pen Camera Flash Rear Camera Battery Kensington Lock Slot NFC Antenna Expansion Port Cover Speaker Back View 3
L10 Android ™ Quick Start Guide Power Input Volume Control Ethernet Jack Power Button Right View microSD Card Slot Access Door Rotate Lock USB Type-C Port Left View Docking Connector Bottom View 4 USB Type-A Ports (2) Headset Jack
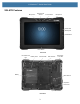
L10 Android ™ Quick Start Guide XPAD Features Pen Holder Ambient Light Sensor Front Camera Programmable Function Buttons Speaker Microphone Microphone Power LED Battery LED Reset Switch Home Button Front View Stylus Tether Post Camera Flash Battery Latch Battery Rear Camera Kensington Lock Slot NFC Antenna Expansion Port Cover 5
L10 Android ™ Quick Start Guide Power Input Volume Control Ethernet Jack Rotate Lock Power Button Right View Barcode Scanner microSD USB Type-C USB Type-A Card Slot Ports (2) Port Access Door Headset Jack Left View Barcode Scanner Button Stylus Top View XBOOK ™ L10 The XBOOK L10 is the same as the XSLATE, but includes a companion keyboard and a KickStrap (combination of a kickstand and a hand strap).
L10 Android ™ Quick Start Guide Figure 1 Empty SIM Card Slot Empty SIM card slot Figure 2 SIM Card Slot with Holder SIM card slot with holder 2. Place the nano SIM card into the holder so that it is close to flush with the holder. Make sure that the SIM contacts (gold) are facing down and the notched corner is on the right side as shown in this drawing and in the graphic inside the battery bay of the tablet. Figure 3 Two SIM Cards in Holder Notched corner The holder can hold two nano SIM cards.
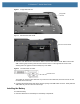
L10 Android ™ Quick Start Guide Figure 4 Battery Replacement 2. Press the battery down until it snaps into place. Charging the Battery To charge the battery: 1. Plug the AC line cord into the power supply. 2. Open the power port door. 3. Plug the power supply output connector into the power port. Power Port Power Port Door 4. Plug the AC line cord into an AC outlet. The battery charging indicator on the front of the tablet blinks amber indicating that the battery is charging.
L10 Android ™ Quick Start Guide ATEX/IECEx For the ATEX/IECEx related standard refer to ATEX User Guide for more information.
www.zebra.