ET80/ET85 Rugged 2-in-1 Tablet Product Reference Guide for Microsoft® Windows® 10 MN-004138-02EN Rev A
ZEBRA and the stylized Zebra head are trademarks of Zebra Technologies Corporation, registered in many jurisdictions worldwide. All other trademarks are the property of their respective owners. © 2021 Zebra Technologies Corporation and/or its affiliates. All rights reserved. Information in this document is subject to change without notice. The software described in this document is furnished under a license agreement or nondisclosure agreement.
Contents About This Document ........................................................................................................................ 7 Introduction ...................................................................................................................... 7 Configurations .................................................................................................................. 7 Energy Star ..................................................................................
Contents Tablet Mode Start Screen....................................................................................... 23 Multi-Touch Gestures ............................................................................................. 25 Configuring Touch Settings.............................................................................. 25 Changing Touch Mode ........................................................................................... 25 On-Screen Keyboard ............................
Contents Wireless ............................................................................................................................................. 40 Wireless Local Area Networks ....................................................................................... 40 Connecting to a Wi-Fi Network ............................................................................... 41 Viewing Network Information ..................................................................................
Contents Viewing the Power Pack Charge Level .................................................................. Checking Power Pack Status ................................................................................. Keyboard....................................................................................................................... Attaching the Keyboard .......................................................................................... Removing the Keyboard ...........................
About This Document Introduction This guide provides information about using the device and accessories. NOTE: Screens and windows pictured in this guide are samples and can differ from actual screens.
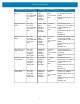
About This Document Configuration Processor Memory ET80 TGL i5 Core WLAN TGL U42 4 +2 Core i5-1130G7 8MB LLC Gen12 GFX 8 GB or 16GB RAM/ 128 GB or 256 GB or 512 GB PCIe SSD 3:2 Aspect Ratio TGL U42 4 +2 Core i5-1130G7 8MB LLC Gen12 GFX 8 GB or 16GB RAM/ 128 GB or 256 GB or 512 GB PCIe SSD 3:2 Aspect Ratio ET85 TGL i5 Core WAN Display 12.0 inch 800 Nits 12.0 inch 800 Nits Radios WLAN: Intel Typhoon Peak 2 WIFI6E 802.11ax 2X2 MIMO WPAN: Bluetooth v5.2 Low Energy WLAN: Intel Typhoon Peak 2 802.
About This Document Energy Star Zebra products that are Energy Star qualified help you save money while improving the quality of the environment. The sleep mode of your tablet is especially adept at saving energy, often up to 80% or more. ENERGY STAR® is the government-backed symbol for energy efficiency, providing simple, credible, and unbiased information that you can rely on to make well-informed decisions.
About This Document NOTE: The text here indicates information that is supplemental for the user to know and that is not required to complete a task. IMPORTANT: The text here indicates information that is important for the user to know. CAUTION—EYE INJURY: Wear protective eyewear when performing certain tasks. CAUTION—PRODUCT DAMAGE: If the precaution is not taken, the product could be damaged. CAUTION: If the precaution is not heeded, the user could receive minor or moderate injury.
About This Document Software Release Information To check the software release information: 1. Touch the Start icon . 2. Select Settings > System > About. • Device Specifications - Displays the device model number followed by the software release date and serial number. • Windows Specifications - Displays the OS version.
Getting Started This section explains how to set up the device for the first time. Unpacking 1. Carefully remove all protective material from the device and save the shipping container for later storage and shipping. 2. Verify that the following were received: • Rugged 2-in-1 tablet • Regulatory guide • SIM lock plate with screw (may be available on some ET85 models) 3. Inspect the equipment for damage.
Getting Started Features NOTE: Some features may not be available on all configurations. Figure 1 Front View 1 2 3 45 2 6 22 17 18 21 19 20 19 8 18 17 14 16 13 12 11 10 7 9 15 1 Light sensor Determines ambient light for controlling display backlight intensity. 2 Front microphones Use for voice communications or audio recordings. 3 Windows Hello Infrared Illuminator Illuminates your face with infrared (IR) light during Windows Hello face authentication.
Getting Started 13 USB-A port Provides USB host and client communications. 14 USB-C port Provides USB host and client communications, and device charging via cables and accessories. 15 Scanner window Provides data capture using the imager. 16 Dock interface connector Provides communication to the device from the dock. 17 Speakers Provides audio output. 18 Keyboard latch slot Attaches the keyboard to the tablet. 19 Keyboard alignment slot Assists in aligning the tablet with the keyboard.
Getting Started 10 Communication expansion port For Ethernet and serial communication through the expansion adapter. 11 NFC antenna position Use to read NFC cards. 12 Battery cover Provides access to the replaceable battery. 13 Solid State Drive Cover Provides access to the solid state drive. Setting Up the Device To start using the device for the first time: 1. Install a nano SIM card (optional for ET85 only). 2. Charge the device. 3. Power on the device. Installing a nano SIM Card 1.
Getting Started 4. Using index fingers, life the battery up. 5. Insert the nano SIM card with the contacts facing up. 6. Push the SIM card in and ensure that it locks into place. 7. If required, install the SIM lock plate and secure with the M1.4 x 2 mm screw using a Phillips #0 screwdriver. The maximum torque for the screw is 1 kg/m (7 lb/ft). 8. Replace the battery, ensuring it is seated properly.
Getting Started 9. Slide the battery lock switch to the lock position. CAUTION: Be aware of the orientation of the battery cover. Failure to replace the battery cover properly may cause damage. 10. Align the tabs on the underside of the cover with the slot around the battery well. 11. Ensure that the chamfer on the battery cover is at the bottom left corner of the device.
Getting Started 12. Carefully press down around the edges of the cover. Make sure that the cover is seated properly.
Using the Tablet This chapter provides instructions on how to use some basic applications and key features. Start Screen By default, the Start screen displays in Desktop mode. Figure 3 Start Screen in Desktop Mode 1 Users Opens user account window, locks screen or logs user off the device. 2 Documents Opens documents folder. 3 Pictures Opens pictures folder. 4 Settings Opens the Settings window. 5 Power Touch to place the device in sleep mode, shutdown or restart.
Using the Tablet 6 Start Access the Home screen from any window. 7 Search Search apps, settings, and files on your tablet or perform a web search. 8 Cortana Opens voice activated search window. 9 Recent Applications Displays all open applications. 10 More Settings Includes Bluetooth, Intel Graphics, and Windows Defender. 11 Battery Displays current battery status. 12 Network Opens network settings. 13 Sound Use to control audio volume level. 14 Keyboard Opens the virtual keyboard.
Using the Tablet • Turn off all wireless radio activity when not in use. Optimizing Battery Life or Performance Optimize the battery life when running the tablet on battery power, or optimize performance when the tablet is connected to a power source. 1. In the taskbar, touch the battery icon and use the slider to adjust for battery life or performance. 2. Touch Battery settings to display battery saver options.
Using the Tablet Battery Health Monitor Use the Battery Health Monitor app to view battery health and information. • Battery Health - The health of the battery. • Manufacture Date - The date of manufacture. • Serial Number - Serial number of the device. A warning message appears if the battery is past its useful life and should be replaced. Viewing Battery Health 1. In the taskbar, select 2. Select . . Tablet Mode This section describes how to configure and use tablet mode.
Using the Tablet 1. Touch All Settings > System > Tablet mode. • • When I sign in: • Use tablet mode - set to tablet mode after signing in. • Use desktop mode - set to desktop mode after signing in. • Use the appropriate mode for my hardware - let the tablet determine if it is.
Using the Tablet Figure 4 Start Screen in Tablet Mode 1 Pinned tiles Places the Home screen in Tile view. 2 All apps Lists all applications alphabetically. 3 Users Opens user account window, locks screen or logs user off the device. 4 Documents Opens documents folder. 5 Pictures Opens pictures folder. 6 Settings Opens the Settings window. 7 Power Touch to place the device in sleep mode, shutdown or restart. 8 Start Access the Home screen from any window.
Using the Tablet 16 Sound Use to control audio volume level. 17 Keyboard Opens the virtual keyboard. 18 Action Center Provides easy access to some frequently used settings and notifications. Touch the icon to open the Action Center. The first row of setting option boxes display and any notifications. Touch Expand to view all setting option boxes. Multi-Touch Gestures Depending on the application, some gestures might not be available.
Using the Tablet 2. When prompted to allow device changes, touch Yes. The Touch Mode window displays with the current mode indicated. 3. Touch the desired option to change the mode, then touch OK. On-Screen Keyboard Use the On-Screen Keyboard to type text, numbers, symbols, and other characters. The touch keyboard and handwriting panel also can be used to perform handwriting.
Using the Tablet 3. Select from desired options. 1 Small keyboard 2 Handwriting panel 3 Alternate keyboard layout 4 All settings 5 Region and language 6 Small keyboard 7 Change keyboard width Active Stylus The tablet supports stylus pens with Microsoft pen protocol MPP 2.0 technology, including the ET80/ET85 active stylus.
Using the Tablet Using the Camera 1. Ensure the front camera privacy cover (1) or rear camera privacy cover (2) is open. 1 2 2. Open the camera application. The Camera Indicator LED illuminates. 3. Point the camera at an object. 4. Touch the on-screen shutter button to take a photo or record a video.
Using the Tablet Fingerprint Reader You can use the fingerprint reader to log on to the tablet by reading your fingerprint instead of entering a password. This feature provides an additional level of security for the tablet. NOTE: The fingerprint reader is available only on some configurations. These instructions assume that you have a password for logging into your tablet. Setting Up a PIN IMPORTANT: To use the fingerprint reader, you need to set up a PIN.
Using the Tablet 10. When successful, touch Close. 11. Next time you log in, you can use your PIN or you can use your finger on the fingerprint reader. NOTE: You can register more than one finger to use with this reader. Keep in mind which fingers you have established with the reader and use only those fingers. Logging In with Your Fingerprint When you start the tablet or wake it up from sleep mode, put your finger on the fingerprint scanner and press it for a brief time.
Using the Tablet Windows Hello Face You can use the front camera to log on to your tablet using Windows Hello Face Authentication instead of entering a password. Setting Up Windows Hello Face To use Windows Hello Face, you need to set up a PIN. For steps on how to set up a PIN, see Setting Up a PIN on page 29. 1. Touch the Windows Start icon and touch the Settings icon. The Settings window appears. 2. Touch the Accounts icon. The Accounts window appears. 3. In the left pane, touch Sign-in options. 4.
Software This chapter provides instructions on initial setup, how to reset the tablet, and how to reinstall Windows. Initial Windows Setup After performing a factory reset or updating the tablet firmware or operating system, the Windows setup process begins. The welcome screen appears and then a series of windows prompt you for information regarding your preferences including Keyboard Layout, Network Setup, Account Name, Security, and Privacy.
Software Reinstall Windows Create an installation USB flash drive to reinstall the operating system on the device. CAUTION: All data on the tablet is erased upon installation. Creating an Installation USB Flash Drive Before you begin, request software for your tablet by visiting Zebra Support and Downloads at zebra.com/support and download the software to a host computer. NOTE: Make sure the entire file downloads completely. Partial downloads may corrupt the device. 1.
Software Reinstalling Windows Before you begin, connect either the ET80/ET85 keyboard or any standard USB keyboard to the tablet. A physical keyboard is required to complete the setup. 1. Connect the tablet to a power source. 2. Plug the bootable USB flash drive into the tablet USB port. 3. Re-boot the device. 4. When the Zebra loading screen appears, select BBS from the top right corner. 5. Select USB. The tablet boots to WinPE and installs the operating system and BIOS updates.
Software Check Versions You may check the versions for: • BIOS Version • Operating system Version Checking BIOS Version To check the current version of the BIOS: 1. In the search field, type cmd, then touch Command Prompt Desktop App to open. 2. In the Command window, type msinfo32. 3. Press Enter key. The System Information window appears. The BIOS version displays in the BIOS Version/Date field.
Software 7. Touch Restart. Zebra Barcode Scanning Resources To obtain Zebra scanning resources such as applications, SDKs, drivers, and RFID software see the Zebra Barcode Scanning Software web page at: zebra.com/us/en/products/software/scanning-systems.html. Application Installation Install programs and apps from the Internet, or a local network. Make sure you trust the publisher of the app and the website. In your web browser, tap or click the link to the app.
Data Capture The device supports data capture using an integrated scanner and Windows compatible Zebra Bluetooth and USB scanners. For information on pairing and scanning using Zebra scanners, go to the Product Reference Guide for your scanner. NOTE: When using 123Scan to configure the ET80/85 on-board scan engine, a mouse is required. 123Scan does not support touch screen use.
Data Capture • Range: Scanners decode best over a particular working range — minimum and maximum distances from the barcode. This range varies according to barcode density and scanning device optics. Scan within range for quick and constant decodes; scanning too close or too far away prevents decodes. Move the scanner closer and further away to find the right working range for the barcodes being scanned. • Angle: Scanning angle is important for quick decodes.
Data Capture 4. Ensure the barcode is within the area formed by the aiming pattern. The aiming dot increases visibility in bright lighting conditions. A beep sounds to indicate the barcode was decoded successfully. When the Internal Scanner is in Pick List mode, the tablet does not decode the barcode until the aiming dot touches the barcode. Figure 6 Internal Scanner Aiming Pattern Figure 7 Internal Scanner Pick List Mode with Multiple Barcodes in Aiming Pattern 5. Release the scan button.
Wireless This section provides information on the wireless features: • Wireless Local Area Network (WLAN) • Wireless Wide Area Network (WWAN) • Bluetooth • Near Field Communications (NFC). Wireless Local Area Networks Wireless local area networks (WLANs) allow the device to communicate wirelessly inside a building that has the appropriate WLAN infrastructure. Both the infrastructure and the device must both configured properly to enable this communication.
Wireless Table 1 WLAN Security Options (Continued) Security Type WPA2-Enterprise Encryption AES EAP Method Protected EAP (PEAP) Authentication Method Secured password (EAP-MSCHAPv2) Smart card or other certificate Smart Card or other Certificate EAP-TTLS Unencrypted password (PAP) CHAP Microsoft CHAP (MS-CHAP) Microsoft CHAP v2 (MS-CHAPv2) Smart card or other certificate Secured password (EAP-MSCHAPv2) 802.
Wireless Viewing Network Information To view security, address, and other information about the connected Wi-Fi network: 1. In the taskbar, touch the network icon. A list of available Wi-Fi networks display. 2. Touch the Wi-Fi network name. 3. Touch Properties. Configuring Proxy Settings The device supports the proxy feature for Wi-Fi connections. The proxy feature enables access to more Web-based source and browse the Internet more securely.
Wireless Wireless Wide Area Networks NOTE: ET85 only. A Wireless wide area network is a mobile cellular network that allows you to browse the Internet, check email, or connect to a virtual private network (VPN) from anywhere within the regional boundaries of the cellular service. A micro SIM card is required to connect to a mobile network. Connecting to a Cellular Data Network 1. Ensure that an activated SIM card is installed. 2. Touch 3. Touch the in the taskbar.
Wireless 5. Touch the Apply this profile check box if you want the APN profile to be used right after you save it. 6. Touch Save > OK. Setting Up a SIM PIN A SIM PIN helps prevent other people from using your cellular data connection. To set up a SIM PIN: 1. Touch Settings > Network & Internet > Cellular. 2. Touch the cellular connection name. 3. Touch Advanced options. 4. Under the Security section, touch Use SIM PIN. 5. Enter the SIM PIN. If this is the first time using it, type the default SIM PIN.
Wireless To find this setting if your SIM is blocked, 1. Touch Settings > Network & Internet > Cellular. 2. Touch the cellular connection name. 3. Touch Advanced options > Unblock SIM PIN under the Security section. 4. Type the PUK code. If an incorrect PUK code is entered too many times, your SIM card will be blocked permanently, and you will need to obtain a new SIM card from your mobile operator.
Wireless Bluetooth Bluetooth-equipped devices can communicate without wires, using frequency-hopping spread spectrum (FHSS) radio frequency (RF) to transmit and receive data in the 2.4 GHz Industry Scientific and Medical (ISM) band (802.15.1). Bluetooth wireless technology is specifically designed for short-range (100 meters (328 feet)) communication and low power consumption. Devices with Bluetooth capabilities can exchange information (e.g.
Wireless Recommendations are: • Perform pairing in a secure environment • Keep PIN codes private and do not store the PIN codes in the device • Implement application-level security. Bluetooth Profiles The device supports the following Bluetooth services: • Advanced Audio Distribution Profile (A2DP) - Allows the device to stream stereo-quality audio to a wireless headset or wireless stereo speakers.
Wireless Pairing with a Bluetooth Device To connect and exchange data with another Bluetooth device, pair the tablet with another Bluetooth device: 1. In the taskbar, touch the Action Center icon. 2. Touch All Settings, then touch Devices > Bluetooth. 3. Slide the control to the right to turn it on. 4. Touch the plus sign to select Add Bluetooth or other device then in the Add a Device window, touch Bluetooth. 5. Discoverable Bluetooth devices populate the window. 6.
Wireless Near Field Communications The device supports reading NFC cards. The NFC antenna is located on the back of the device under the NFC logo. Enabling NFC NFC is disabled by default. Before using NFC, you must enable it in the BIOS and then in Windows. 1. Enter the BIOS setup. See Enter the BIOS on page 35. 2. From the BIOS setup screen, select the Advanced tab. 3. Select NFC Controller > Enabled. 4. Select the Save & Exit tab. 5. Select Exit Saving Changes > Yes. 6.
Accessories This section provides information for using the accessories for the device. This following table lists the accessories available for the device. Table 2 Accessories Accessory Part Number Description Docks Vehicle Dock CRD-ET8X-VEHDK1-01 Provides tablet charging, USB communication, and Ethernet communication. Includes set of 10-32 nuts (4), screws (4), and washers (4). Mount not included. Supports VESA 100 x 100, 100 x 50, and 75 x 75.
Accessories Table 2 Accessories (Continued) Accessory Part Number Description Carrying Solutions Soft Handle SG-ET8X-HANDLE1-01 Use with the boot to carry the tablet. Shoulder Strap SG-ET8X-SHLDR1-01 Use with the boot to carry the tablet on your shoulder. Boot SG-ET8X-BOOT1-01 Adds extra protection for the tablet. Expansion Module CRD-ET8X-M-7PEM1-01 Provides USB communication and Ethernet communication.
Accessories Table 2 Accessories (Continued) Accessory Part Number Description Charge Cables and Power Supplies Cigarette Lighter Adapter (CLA) cable 450143 Provides power to the vehicle dock for vehicles providing 12V. Cigarette Lighter Adapter (CLA) cable 450019 Provides power to the vehicle dock for vehicles providing 12V to 32V. Direct Wire Power Cable 450134 Use with CLA cable (450019) to connect directly to vehicle power.
Accessories Device Charging Before using the tablet for the first time, connect it to an external power source. Keep the tablet connected to the external power source until it is fully charged. The Charging Indicator LED turns green when the tablet is fully charged. You may use the tablet while it is charging. For the best charging experience, Zebra recommends using the ET80/ET85 dock or the Zebra USB-C to AC adapter.
Accessories 2. If installed, ensure the keyboard and handle are closed. 3. Insert the bottom of the tablet into the bottom of the dock (1), aligning the charging contacts on the tablet with the connector pins on the dock. 4. Rotate the top of the tablet towards the top of the dock (2).
Accessories 5. Use your thumb to push the tablet into the dock, then push the lever down to secure the tablet. 6. After the tablet is secured in the dock, you can lower the keyboard (optional). Removing the Tablet 1. If installed, ensure the keyboard is closed. 2. To remove the tablet from the dock, lift the lever on top of the dock (1) to release the tablet, rotate the top of the tablet down (2), then lift the tablet out of the dock (3).
Accessories Charging Using the USB-C to AC Adapter Use the USB-C to AC adapter to charge the tablet. 1. Plug the AC line cord into the USB-C to AC adapter (1). 2. Plug the AC line cord into the AC wall outlet (2).
Accessories Power Only Dock The Power Only Dock provides: • Power for operating the device. • Charging for the device’s battery and optional Power Pack installed in an Expansion Back. • Barrel lock and two keys to secure the tablet to the dock. • Support for VESA 100 x 100, 100 x 50, and 75 x 75. Figure 8 Power Only Dock Setup .
Accessories Vehicle Dock The Vehicle Dock provides: • Power for operating the device. • Charging for the device’s battery and optional Power Pack installed in an Expansion Back. • Ports for connecting USB devices and Ethernet communication. • Barrel lock and two keys to secure the tablet to the dock. • Support for VESA 100 x 100, 100 x 50, and 75 x 75.
Accessories Office Dock The Office Dock provides: • Power for operating the device. • Charging for the device’s battery and optional Power Pack installed in an Expansion Back. • Ports for connecting USB devices, HDMI video output, and Ethernet communication. • Barrel lock and two keys to secure the tablet to the dock. • Desktop mount.
Accessories Expansion Backs The Expansion Backs provide a Power Pack slot for the device and either a hand strap or Smart Card CAC reader. Installing the Expansion Backs 1. Power off the tablet before installing or removing the Expansion Back. 2. Lift the notched corner of the battery cover and carefully lift the battery cover off the device. Store the cover in a safe place. 3. Align the expansion back with the device.
Accessories 4. Using a T6 Torx screwdriver, secure expansion back to device using four screws. Torque to 14 n-cm.
Accessories Power Pack The optional Power Pack provides additional power to the tablet. Figure 11 Power Pack 2 3 1 1 Power output contacts 2 Charge level indicators 3 Charge indicator button Installing the Power Pack 1. Install one of the optional Expansion Backs. 2. Press the two release buttons (1) on the side of the Expansion Back. The dummy battery insert ejects slightly. 1 3. Remove dummy battery insert.
Accessories 4. Insert Power Pack into slot until it snaps into place. Power Pack Charging Charge Power Packs in ambient temperatures from 0°C to +50°C (32°F to 122°F) as reported by the Power Pack. Charging is intelligently controlled by the charger. To accomplish this, for small periods of time, the charger alternately enables and disables Power Pack charging to keep the battery at acceptable temperatures. The Power Pack charge LED shows the status of the battery charging.
Accessories Figure 12 4-Slot Battery Charger Viewing the Power Pack Charge Level 1. Remove the Power Pack from the Expansion Back. 2. Press the Charge Status button (2). The Charge Status LEDs (1) light to indicate the charge level. 1 2 Table 3 Power Pack Charge Status Indicators Power Pack Indicators Description Charge level is 100%. Charge level is 80%. Change level is 60%.
Accessories Table 3 Power Pack Charge Status Indicators (Continued) Power Pack Indicators Description Charge level is 40%. Charge level is 20%. Charge level is below 20%. Blinking Checking Power Pack Status Power Pack status appears on the desktop taskbar. NOTE: The Power Pack Status icon appears when it issues a notification. To always display the icon, select > Customize. In the Notification Area Icons window, check the Always show all icons and notifications on the taskbar and then select OK.
Accessories Keyboard The ET80/ET85 attachable rugged keyboard is a QWERTY keyboard that provides a multi-color backlight and six programmable keys. Figure 13 ET80/ET85 Keyboard Features 1 2 3 2 1 4 5 6 9 8 7 1 Keyboard latch Attaches the keyboard to the tablet. 2 Keyboard alignment pin Assists in aligning the keyboard with the tablet. 3 Tablet interface connector Provides power and communication from the tablet.
Accessories Attaching the Keyboard 1. Place the keyboard on a flat and level surface. 2. Align the keyboard alignment markings on the tablet and keyboard. 3. Gently press the tablet down onto the keyboard until you hear a click. When the keyboard is correctly installed, the keyboard locking switch automatically clicks into the lock position and the orange indicator is hidden under the switch.
Accessories Removing the Keyboard 1. Place the tablet on a flat and level surface. 2. Ensure the keyboard and tablet are in the open position. 3. Move the keyboard locking switch to the Unlock position. When in the unlock position, the orange indicator is visible to the left of the switch. 4. Lift the tablet from the keyboard.
Accessories Setting the Backlight Color Customize the keyboard backlight color. 1. In the taskbar, select > . 2. Select the desired color. 3. Select OK. Configuring the Programmable Keys Customize the programmable keys to start your favorite program or open a web page. 1. In the taskbar, select > . 2. Select the desired key (P1-P5). 3. Select the type of action. • Open Application - Provide a path to the desired application. For example, C:\Windows\notepad.exe. • Open Web page - Provide a URL.
Maintenance and Troubleshooting This chapter includes instructions on cleaning and storing the tablet, battery maintenance and provides troubleshooting solutions for potential problems during tablet operations. Maintaining the Device For trouble-free service, observe the following tips when using the device: • In order to avoid scratching the screen, use the supplied stylus or plastic-tipped pens intended for use with a touch-sensitive screen.
Maintenance and Troubleshooting Maintaining the Stylus If you use an active (digitizer) pen with your tablet: • Store the active (digitizer) pen in the pen holder when not in use. • Avoid storing the pen vertically on its tip. It can damage the pen-to-digitizer function. • Keep the pen away from any liquid, because the pen contains electronic components that can be damaged when wet. • In certain environments, particles or debris can stick to the pen tip or the tablet display.
Maintenance and Troubleshooting Best Practices for Enterprise Mobile Computing Devices Operating in Hot Environments and Direct Sunlight Exceeding the operating temperature by external hot environments will cause the device's thermal sensor to notify the user of a shutdown of the WAN modem or shutdown the device until the device's temperature returns to the operational temperature range.
Maintenance and Troubleshooting Device Cleaning Instructions Do not apply liquid directly to the device. Dampen a soft cloth or use pre-moistened wipes. Do not wrap the device in the cloth or wipe, but gently wipe the unit. Be careful not to let liquid pool around the display window or other places. Allow the unit to air dry before use. NOTE: For thorough cleaning, it is recommended to first remove all accessory attachments, such as hand straps or boot, from the tablet and to clean them separately.
Maintenance and Troubleshooting Traveling with Your Tablet Use the following tips when you travel with your Tablet: • Put the tablet in a case to protect the display. • Store the pen in the pen bay located on the tablet. • Pack the tablet securely in a briefcase or hand-carried luggage and keep it separate from toiletries, liquids, and food. Don’t pack it in checked luggage.
Maintenance and Troubleshooting Troubleshooting the Tablet This section provides troubleshooting options for the device. Table 4 Troubleshooting the Tablet Problem Tablet does not turn on. Cause Solution Battery not charged. Charge the battery in the tablet. Battery not installed properly. Ensure battery is installed properly. System crash. If the tablet does not turn on, perform a cold boot. See Performing a Cold Boot on page 74. Battery failed. Replace battery.
Maintenance and Troubleshooting Troubleshooting the Dock This section provides troubleshooting options for the dock. Table 5 Troubleshooting the Dock. Problem Battery is not charging. Cause Solution Battery failed. Replace battery. If the tablet still does not operate, try a cold boot. See Performing a Cold Boot on page 74. Dock was unplugged from power source. Ensure the dock is receiving power. Ambient temperature of the dock is too warm or too cold.
Specifications For device technical specifications, go to zebra.com/support.
Specifications Table 8 SE4107 Decode Distances (Continued) Typical Working Ranges Symbol Density/ Bar Code Type 100% UPCA 15 mil QR Code 20 mil QR Code 20 mil Code 39 Near Far 1.8 in. 19.5 in. 5.1 cm 26.2 cm 1.2 in. 12 in. 4.6 cm 30.5 cm 1.2 in. 14 in. 4.6 cm 35.6 cm 2.0 in. 26.0 in. 5.1 cm* 66.0 cm *Limited by width of bar code in field of view. Notes: Photographic quality bar code at 15° tilt pitch angle under 30 fcd ambient illumination.
zebra.