
U.M. Android v6.0.1
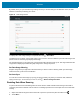
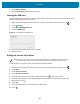

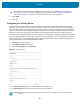


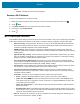
Table Of Contents
- Copyright
- Terms of Use
- Revision History
- Table of Contents
- About This Guide
- Getting Started
- Using the Tablet
- Introduction
- Google Mobile Services
- Home Screen
- Applications
- Suspend Mode
- Rebooting the ET5X
- Applications
- Wireless
- Data Capture
- Expansion Back
- RS507 Hands-Free Imager
- RS6000 Bluetooth Ring Scanner
- Scanning Considerations
- Imaging
- Bar Code Capture Using the SE4750 Expansion Back
- Bar Code Capture Using RS507 Hands-Free Imager
- Bar Code Capture Using RS6000 Bluetooth Scanner
- Bar Code Capture with DS36X8 Scanner
- Pairing the RS507/RS6000 Using SSI
- Connecting a DS3608 USB Scanner
- Pairing a DS3678 Bluetooth Scanner
- Accessories
- Maintenance and Troubleshooting
- Specifications
- Index

Wireless
87
6. In the Bypass proxy for text box, enter addresses for web sites that do not require to go through the proxy
server. Use the separator “|” between addresses.
7. Touch Connect.
8. Touch .
Configuring the Device to Use a Static IP Address
By default, the device is configured to use Dynamic Host Configuration Protocol (DHCP) to assign an Internet
protocol (IP) address when connecting to a wireless network. To configure the device to connect to a network using
a static IP address:
1. In the Wi-Fi list, touch a network.
2. Touch Show advanced options checkbox.
3. Touch IP settings and select Static.
Figure 55 Static IP Settings
4. In the IP address text box, enter an IP address for the device.
5. If required, in the Gateway text box, enter a gateway address for the device.
6. If required, in the Network prefix length text box, enter a the prefix length.
7. If required, in the DNS 1 text box, enter a Domain Name System (DNS) address.
8. If required, in the DNS 2 text box, enter a DNS address.
9. Touch Connect.
10. Touch .