
U.M. Android v6.0.1
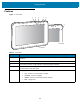
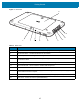
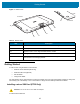
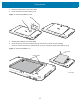
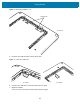
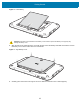

Table Of Contents
- Copyright
- Terms of Use
- Revision History
- Table of Contents
- About This Guide
- Getting Started
- Using the Tablet
- Introduction
- Google Mobile Services
- Home Screen
- Applications
- Suspend Mode
- Rebooting the ET5X
- Applications
- Wireless
- Data Capture
- Expansion Back
- RS507 Hands-Free Imager
- RS6000 Bluetooth Ring Scanner
- Scanning Considerations
- Imaging
- Bar Code Capture Using the SE4750 Expansion Back
- Bar Code Capture Using RS507 Hands-Free Imager
- Bar Code Capture Using RS6000 Bluetooth Scanner
- Bar Code Capture with DS36X8 Scanner
- Pairing the RS507/RS6000 Using SSI
- Connecting a DS3608 USB Scanner
- Pairing a DS3678 Bluetooth Scanner
- Accessories
- Maintenance and Troubleshooting
- Specifications
- Index

Getting Started
16
Figure 3 Bottom View
Getting Started
In order to start using the ET5X for the first time:
• install the micro SIM Card (ET55 only)
• install microSD card (optional)
• start the ET5X
• configure the ET5X.
The main battery can be charged before or after it is installed. Use one of the spare battery chargers to charge the
main battery (out of the ET5X), or one of the cradles to charge the main battery installed in the ET5X.
Installing a micro SIM Card (ET55 Only)
To install a micro SIM card:
Table 4 Bottom View
Item Description
16 NFC Antenna Position - Use to read NFC cards and RFID tags.
17 Stereo Speakers - Provides audio playback.
18 Alignment Holes - Use to align the tablet with the cradles.
19 Docking Connector - Interfaces with the cradle.
20 Latching Slots - Provides locking mechanism when docking the tablet to the
Communication and Charging Cradles.
17
19
17
16
17
8” Version
10” Version
18
20
CAUTION: Do not use nano to micro SIM card adapters.