
U.M. Android v5.1.1
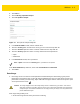
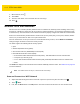
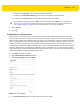
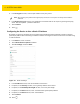
Table Of Contents
- Revision History
- Table of Contents
- About This Guide
- Chapter 1 Getting Started
- Chapter 2 Using the Tablet
- Introduction
- Google Mobile Services
- Home Screen
- Applications
- Suspend Mode
- Rebooting the ET5X
- Chapter 3 Applications
- Chapter 4 Wireless
- Chapter 5 Data Capture
- Chapter 6 Accessories
- Chapter 7 Maintenance and Troubleshooting
- Appendix A Specifications
- Index

Wireless 4 - 7
Figure 4-4 Wi-Fi Screen
4. Scroll through the list and select the desired WLAN network.
5. For open networks, touch profile once or press and hold and then select Connect to network or for secure
networks enter the required password or other credentials then touch Connect. See the system administrator
for more information.
6. The ET5X obtains a network address and other required information from the network using the dynamic host
configuration protocol (DHCP) protocol. To configure the ET5X with a fixed internet protocol (IP) address, See
Configuring the Device to Use a Static IP Address on page 4-10.
7. In the Wi-Fi setting field, Connected appears indicating that the ET5X is connected to the WLAN.
Configuring a Wi-Fi Network
To set up a Wi-Fi network:
1. Swipe down with two fingers from the status bar to open the quick access panel and then touch .
2. Touch Wi-Fi.
3. If off, slide the switch to the ON position.
4. The device searches for WLANs in the area and lists them on the screen.
5. Scroll through the list and select the desired WLAN network.
6. Touch the desired network. If the network security is Open, the device automatically connects to the network.
For all other network security a dialog box appears.
7. If the network security is WEP or WPA/WPS2 PSK, enter the required password and then touch Connect.
8. If the network security is 802.1x EAP: