
Integrator Guide for Windows 10
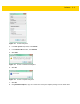
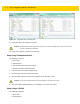

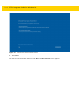

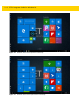
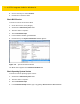
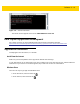

Table Of Contents
- Revision History
- Table of Contents
- About This Guide
- Chapter 1 Getting Started
- Chapter 2 Accessories
- Chapter 3 Software
- Chapter 4 Maintenance and Troubleshooting
- Appendix A Specifications
- Index

Software 3 - 5
•
USB Hub with external power supply
•
USB cable
•
USB charger
•
Bootable installation USB thumb drive.
1. Connect power to the ET5X.
2. Connect power supply to USB hub.
3. Connect the USB keyboard connector into a USB hub.
4. On the ET5X, open the access door on the right side of the device.
5. Connect USB cable from the USB port to the USB hub.
6. Plug the bootable USB thumb drive into the USB hub.
Updating the Operating System
To update the software:
1. Re-boot the ET5X.
2. When the ET5X reboots, press the ESC key when the logo displays. The Boot screen appears.
3. On the keyboard, press the right arrow key until Boot Manager highlights.
4. Press ENTER. The following displays:
•
Windows Boot Manager
•
EFI USB Device (USB thumb drive type)
•
Internal EFI Shell
5. On the keyboard, press the down arrow key until EFI USB Device highlights.
6. Press ENTER. The ET5X boots to WinPE and installs operating system and BIOS updates. Installation takes
approximately nine minutes.
When complete, the device boots and the Windows setup screen appears.
7. Follow the on-screen setup instructions.
8. At the Choose how you’ll connect screen:
•
Select Join Azure Active Directory if your organization uses Office 365 or other business services from
Microsoft.
•
Select Join a local Active Directory domain to setup a local account and then join the domain in Settings.
CAUTION
All data on the ET5X will be deleted.
NOTE
If Boot Manager dose not display EFI USB Device (USB thumb drive type), confirm that the USB is
formatted as FAT32 and that
bootmgr.efi file is visible the USB. Re-seat the USB in the USB port and
try again. If the problem, persist see Creating Installation USB Thumb Drive on page 3-2.