
Integrator Guide for Windows 10
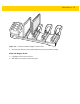
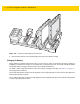
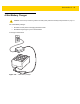
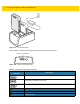
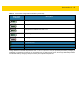
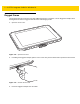

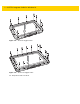
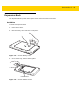
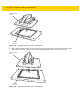
Table Of Contents
- Revision History
- Table of Contents
- About This Guide
- Chapter 1 Getting Started
- Chapter 2 Accessories
- Chapter 3 Software
- Chapter 4 Maintenance and Troubleshooting
- Appendix A Specifications
- Index

Accessories 2 - 27
Figure 2-31 Insert Rugged IO Adapter
4. Remove the Rugged Frame and screws from box.
5. Separate the top and bottom sections of the Rugged Frame.
6. Place the bottom section on a flat surface.
Figure 2-32 Protective Boot Assembly
7. Place the ET5X into the bottom section.
8. Align the top section over the bottom section.
9. Press the top section down onto the bottom section.
10. Using a T6 Torx screwdriver, secure the Rugged Frame together using the provided M1.6 Torx screws.
Rugged IO Adapter
Interface Connector