
U.M. Windows 10
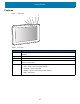
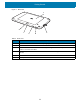

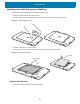
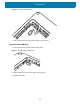


Table Of Contents
- Copyright
- Terms of Use
- Revision History
- About This Guide
- Getting Started
- Introduction
- Unpacking
- Features
- Getting Started
- Replacing the SIM Card
- Replacing the microSD Card
- Using the Tablet
- Wireless
- Data Capture
- Expansion Back
- RS507/RS507X Hands-Free Imager
- RS6000 Bluetooth Ring Scanner
- DS3678 Digital Scanner
- Imaging
- Scanning Considerations
- Scanning with the SE4710 Expansion Back
- Scanning with SE4750 Expansion Back
- Scanning with RS507/RS507X Hands-Free Imager
- Scanning with RS6000 Bluetooth Ring Scanner
- Scanning with the DS3608 USB Scanner or DS3678 Bluetooth Scanner
- Pairing Bluetooth Scanners
- Connecting a USB Scanner
- Accessories
- Maintenance and Troubleshooting
- Specifications
- Index

Getting Started
19
Figure 10 Pressing Down on the Battery Cover
6. Press Power button to turn on the device.
Charging the Battery
Use one of the cradles to charge the main battery installed in the device. See the chapter Accessories for
charging accessories. See Battery Status and Battery Management for additional details.
The main battery charges from fully depleted to 90% in approximately 2 hours and from fully depleted to 100%
in approximately 3 hours.
The Charging indicator only illuminates when the tablet is connected to AC power.
Replacing the SIM Card
CAUTION: To avoid damage to the SIM slot, do not pull the SIM card out of the SIM slot. Push the SIM card in to eject it.
To replace the SIM card:
1. Press and hold the Power button until the menu appears.
2. Touch Power off.
3. Lift the notched corner of the battery cover and carefully lift the battery cover off the device.
4. On the 8.4" version, push the two locking tabs up, then pull up on the tab to remove battery.
5. Push the SIM card in to eject the card.
6. Remove the SIM card from the card slot.
7. Replace the battery.
8. Press the battery down to ensure the two battery latches engage.
9. Replace the battery cover.