
Integrator Guide for Windows

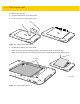
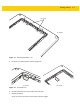
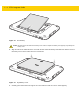
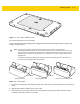
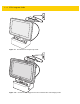
Table Of Contents
- Revision History
- Table of Contents
- About This Guide
- Chapter 1 Getting Started
- Chapter 2 Accessories
- Chapter 3 Software
- Chapter 4 Maintenance and Troubleshooting
- Appendix A Specifications
- Index

Getting Started 1 - 5
Figure 1-7 Press Down on Battery Cover
10. Press Power button to turn on the ET55.
Use the Communication and Charging Cradle, Rugged Communication and Charging Cradle or Charge Only
Cradle to charge the ET5X.
Figure 1-8 ET5X Cradles
1. If using the Communication and Charging Cradle, open the bottom access door and hold it to the back of the
tablet.
2. Align the ET5X with the alignment pins on the cradle.
3. Insert the ET5X into the cradle. Note that the Communication and Charging Cradles contains a locking
mechanism that locks the ET5X to the cradle.
NOTE
The Charge Only Cradle (CRD-ET5X-1SCG1) and the Communication and Charge Cradle
(CRD-ET5X-1SCOM1) come with two inserts; tall insert and short insert. Install the tall insert when using
an ET5X without a Rugged Frame or Expansion Pack. Install the small insert when using an ET5X with an
Expansion Pack and without a Rugged Frame. Do not install either insert when using the ET5X with the
Rugged Frame.
The Rugged Communication and Charge Cradle (CRD-ET5X-1SCOM1R) does not come with inserts.
Use with ET5X and Rugged Frame with IO Adapter.
Communication CradleCharge Only Cradle
Short Insert
Rugged Communication Cradle
Tall Insert